Brige 45A Placed in Service
RGS #42 tiptoes across Bridge 45A for the first time with a stock extra!


As always, your comments, suggestions & questions are welcome.

RGS #42 tiptoes across Bridge 45A for the first time with a stock extra!
As always, your comments, suggestions & questions are welcome.
All the basic ground cover is now in place around Bridge 45A. My original plan was to install all of the scenery behind the bridge before installing the rail. Now I think I want to get trains running again and put off doing the scenery until over the summer.


One of the issues I am facing in March is the amount of time it is taking the matte medium mix to set up. Due to the cold weather, it is taking about 3 days. As a result, I am working on three other projects at the same time.


March 15, 2024
The Dallas Mill Works was introduced in Construction Update #36. Originally, the structure was a canned and frozen fish company on Paul Scholes Pelican Bay Railway and Navigation. Later, as shown below, it found a home on my now dismantled Sn3 Alaska Pacific. Turns out that the fish company, a coastal freighter, the fishing boat and the jib cranes are the only structures I kept off the old layout.


The structure is made up from the three sub-assemblies shown below on my desk getting a few minor repairs including a fresh coat of paint on two of the roofs.


The ground cover is paving sand spread over a 60/40 mix a earth colored exterior latex paint and white glue followed by a misting of "wet" water and diluted matte medium. The Dallas depot/section house, seen on left, was eventually moved a few inches further to the left.

The hole in the backdrop will partially be hid by the milling company. The trees shown below will do the rest.

Here is a up to date photo of the Dallas mill. It still needs some shrubs, static grass and some additional details. The lighting also has to be adjusted due to the shadow being cast on the backdrop. LED strip lighting was added which helped but did not eliminate the problem


I started on the Ridgway Depot kit last June (Construction Update #30). Its back on my desk for some additional work. Basically, the structure is built around a plywood core. The laser cut siding is then applied over the core. Since the siding material (basswood) is prone to warping, I use close pins to hold it in place until the Aleen's tacky glue sets up. At the current pace, I should be able to get the depot finished in a year or two.


The original plan had the tracks looping around Trout Lake south of Matterhorn, crossing the entry door with Lizard Head and Rico located on a shelf above Ridgway. A reverse loop was planned for the dispatcher's office. Not wanting to block the doorway during construction, a temporary return loop was and is installed, shown in red, at Trout Lake. The Trout Lake reverse loop, was covered in Construction Update #16.


The updated plan eliminates Trout Lake, the Trout Lake reverse loop, the lift out across the entry door, the shelf above Ridgway and the reverse loop inside the dispatcher's offic. The Lizard Head wye will now occupy the Trout Lake scene and the hidden Rico staging is tucked in between Ophir and Vance Junction. Rico staging has three tracks; they are at least 10 feet long. This works out to a maximum train length of about 12-13 cars plus a locomotive and caboose.
While the reverse loop is nice for just "running trains", I think eliminating it in favor of the wye at Lizard Head adds more to operations. The wye can be used to realistically turn helpers for their return to Ridgway and the stock pens, that were located on the tail of the wye, will add another switching opportunity.


While looking for some detail parts, I came across a couple of jib cranes. Both were carefully wrapped in bubble wrap; both were in pieces and parts were missing. Rather than leaving them as they were, I decided to fix them and mount them on styrene for future use. The one on the left has a movable crane. The one of the right does not.

Getting Bridge 45A in place seemed like the logical place to start when getting back to work on the layout. Without it, operations were restricted south of Vance Junction. A considerable amount of time was spent carving and cutting away excess Sculptamold from around the bent supports. Eventually, the bridge settled back into proper alignment.
The next step is to get a coat of earth colored paint over the Sculptamold and apply some basic ground cover.

September 4, 2024
On my previous layout, the Arroyo Lobo Branch, I tried using some rubber rock castings sold by Cripplebush Valley Models. https://www.cripplebushvalleymodels.com/. The nice stonework shown here, behind the turntable on the old Arroyo Lobo Branch, was made using the Cripplebush "Sante Fe 3" casting. The rubber castings are light, flexible, and easily cut with a good pair of scissors. The original was 26" by 6". I cut it in half horizontally to create a cut about 50" long by about 3" tall.

For the Bridge 45A scene, I bought two rubber castings, Santa Fe castings #1 and #3. Santa Fe 1 is 28' by 10" and costs $70.00. Santa Fe 3 is 26" by 6" and cost $40.00. They come painted a gray/brown with some highlighting and can be used effectively without any additional work if your lighting creates shadows. The ones shown on the Arroyo Lobo Branch in the lead photo were used right out of the packaging. Additional painting/weathering/highlighting can be done with acrylic paints. Solvent type paints should not be used on these casting.

Following the instructions on the Cripple Brush web site, I made templates, using plain copy paper, and used them to cut out the required pieces from the robber rocks. Here they are pinned in place. During this process, I did make some changes to the hard shell (pink profiles).

September 7, 2024
The rubber rocks were hot glued in place and blended into the existing scenery base with Sculptamold.

After cutting out the rocks, the small left over pieces were added to the scene. After these pictures were taken, the excess Sculptamold was removed off all the castings with a wet toothbrush.

September 25, 2024
Not a lot of detail here as I have covered my "basic" ground cover in previous posts. The rocks were lightened up dry brushing (my basic earth color) followed by a misting of diluted raw sienna, burnt sienna, raw umber and black. The basic earth color was then applied around the rocks.

Basic ground cover, paving sand, was then applied starting with a generous application of a earth color house paint and white glue mix. The paving sand was then spread on to the mix. This was followed by diluted matte medium sprayed over the initial layer of ground cover followed by second application of paving sand. This process was repeated with a third application of paving sand along with several colors of fine ground foam. The wet paint white glue mix is shown on the right side of the photo with the ground cover on the left.

Here is an overall photo of the hillside. The rubber rock shown in the above photo is in the upper right corner of this photo. Working about a square foot at a time, the hillside took about an hour and a half to get to this point. Applying the ground cover, over Scultamold, in several layers insures good coverage and all important texture. Eventually this basic ground cover, that looks pretty good now, will be covered with grasses, shrubs and trees. Oh, and I think those rubber rocks look pretty good!

The Bridge 45A has a river/creek that runs through the scene and cascades down a canyon and under the bridge. Before applying the ground cover around the river I decided to paint the riverbed. Woodland Scenics "Water Undercoat" was used; Hunter Green, Olive Drab and Yellow Silt. All three colors were blended together when they were applied. The track was then sprayed painted with a combination of Rustoleum camouflage Flat Earth Brown and Sand.

Upstream from Bridge 45A there is another river crossing. Originally I was going to cross on a low pile trestle. That is until I came across these cut stone culverts in a drawer. One had some damage but it didn't really matter since one side of the culvert would be difficult to see from the normal viewing angle. Craft paints were used on the stonework.

Here are the culverts installed with ground cover and a few extra details.

When comparing early photographs to ones taken near or after the end of operations, it's readily apparent that over the years, trees and vegetation grew up and around Bridge 45A. Based upon the following photograph (1952) and others taken near the end of operations, it looks like about 70% of the trees are deciduous.

Bruce Hanley came through again when he gave me about 200 trees off his layout. A few will probably need a little "freshening up", but the majority of them are ready to plant. These
combined with the tress I have off the old layout
should be more than enough to finish off the Bridge 45A scene. Since I can't install the bridge until most of scenery is finished behind it, the availability of all the trees off Bruce's layout should speed up the process.

The base for Bridge 45A was built from 12 ply Baltic Birch plywood. Although it is expensive, it doesn't warp. In addition, it will be sealed polyurethane as an added precaution against warping. The ends and four of the intermediate bins have load bearing Baltic Birch supports. The other bents will just be resting on the pink foam scenery base. The bridge itself will sit between guides on each end so it can easily be removed while doing scenery. The base, while it will be screwed to the bench work, can also be removed. The level was used to insure the are no peaks and valleys in the bridge deck while measuring and installing the bent supports.


Here is the bridge temporarily set in place. Pink foam was used to make additionall non load bearing bent supports. Vance Junction is on the other side of the scenic divider.

The tallest bent sat in the middle of the river on a concrete footing/base. I couldn't find a good picture of the concrete footing so I came up with a plausible design, built it out of .060" styrene and painted it gray. It still needs some weathering.

August 16, 2024
The last couple of days have been spent filling in the terrain profiles with pink foam. Here is the current state of the terrain looking south towards Ophir.

A view looking from the north to the south.

Here's another view looking south. The river (center) will drop through a series of water falls before it passes under the bridge. Since I have never attempted modeling any form of moving water, I'm probably going to need some experienced help.


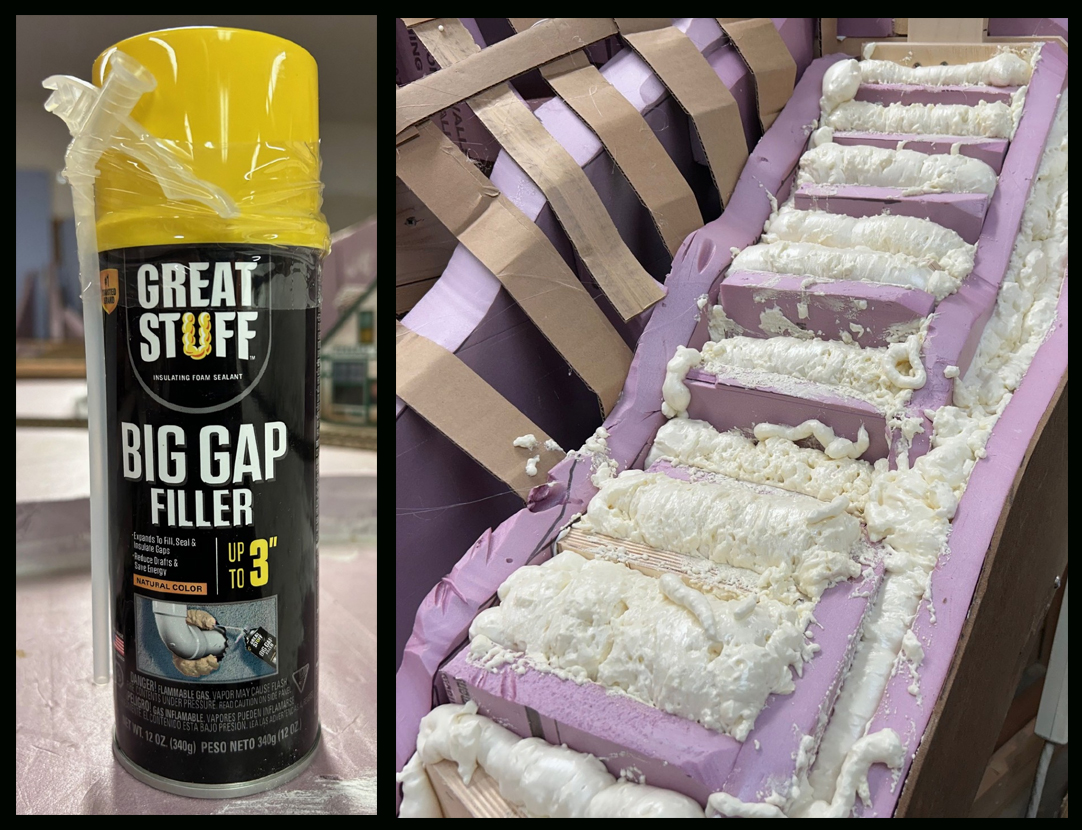
Back from vacation. I have gone over how I do basic scenery in previous posts so I'm not going to go into a lot of detail here. Basically I use cardboard webbing over foam profiles covered by red rosin paper, plaster cloth and Sculptamold. The one thing I did do new was to use gap filling expanding foam to fill in between the pink foam bridge fittings. In the past I would have probably used newspaper covered by plaster cloth but I haven't purchased newspaper in years.

An overall view of the cardboard lattice covered with red rosin paper.

And with a layer of plaster cloth.

