Monday, September 25, 2023

Construction Update #6 - 2nd Placerville Residence, Truck Dump and Scale & Roster Additions


The Second Residence

 September 14, 2023


The second residence to the north is smaller than it's neighbor to the south.  After studying the one good photo I had from the Denver Public Library Digital Collection and the Mike Blazek plan included with the Steve Harris article in the Sept/Oct 2015 issue of the Gazette it became clear there were some pretty significant discrepancies when it came to doors and windows.  I choose to base my model primarily on the photograph and taking the overall dimensions from the plans.  The prototype was small, about 375 square feet.


I ended up eliminating about 4 scale feet from the front half of the building due to space limitations.  I also changed the window next to the door.  As is normally my practice when it comes to scratch building a structure, the core is cut from styrene followed by a layer of scribed wood.  I took the liberty of adding a window to the north side.  It doesn't show up in the plans nor is there a photo of the north side, but it just made since to me.  I left the back wall blank because it will be right up against the backdrop but I think a window or two on the back wall seems logical.


Here it is ready for installation on the layout.


The Truck Dump 

 September 19, 2023
 
The truck dump was built with a few natural twigs purchased from Bob Rorabaugh rorabaugh@msn.com.  Bob sells a variety scenic details including trees, tree making supplies and ground covers. 


The Truck Scale

September 21, 2023

As I mentioned in the last post, I am going to include the truck scale along with the dump in my Placerville Scene.  Since I haven't found any pictures of the actual scale, I did a little research on the internet and came up with a photo of a scale appropriate for my time frame.  Most if not all of the truck scales I found were pretty simple. 

There are three major components; the pit normally made from concrete, the weigh bridge that may be a combination of wood, steel or concrete, and the scale (normally Fairbanks Morris) that was housed in a small shack adjacent to the weigh bridge.  Older weigh stations had the weigh bridge and scale connected by a series of levers.  

Here is a picture of the "typical" 1940's era weigh station.

Weigh Bridge Detail.
 

My model of the scale house is actually the second model I built. The first model was built using a Banta Modelworks Miners Cabin.  I didn't care for the way the structure went together, especially the door and window frames that appeared much to thick in my opinion, so I decided to replace it with a scratch built version using Tichy doors and windows.  The shingles are from American Model Builders.  The stone foundation, that will be set into a slope, was assembled using more left over parts from the Monster Modelworks Placerville Store kit.


A Third Residence

 
As I continue to study photographs from various sources, I keep coming accross additions for my Placerville scene.  I found this picture on the Denver Public Library's Digital Collection.  It sat behind the depot between the store and the garage. Its another relataively easy scratch building  project.  Again, I will have to cut down the depth due to my space limitations..


Placerville 

September 23, 2023
 

Here is an up to date photo of Placerville less the scale house.  As it turned out, I did have just enough room to put the store in its proper location behind Warehouse A/B.  But, I decided to raise it up a few scale feet so it could be more easily viewed.  The structure on the far left is the Miners Supply from Wild West Models.  I haven't been able to find a good photograph of the actual false front building that was located here but it does show up in the background of the lead photo in this post (North and South residences).  For now I will use the Miners Supply but if I do come up with a good photo of the prototype, I'll probably replace it.


Roster Additions

RGS pre-wreck K-27 #455 is a brass factory painted  model from P-B-L.  Caboose #404 is also a factory painted model from P-B-L  It was the only "Long" caboose on the RGS.


As always, your comments, suggestions and questions are welcome


Wednesday, September 13, 2023

Construction Update #5 - Placerville, The Residences, The Truck Dump & Back Drops


Placerville Garage

September 10, 2023

Here is the finished Garage.  A couple of changes were made since the last post.  The color of the trim is now a lighter green and the garage door has horizontal instead of verticle boards.  The lintels have also been added along with some signage.  The "Placerville Garage" sign was created in Word; the Dunlap tire sign was downloaded off the internet.  I think it turned out pretty well considering it was created with left over wall sections from the Monster Modelworks Placerville Store kit.  It's about an inch deep.


Placerville Town

 
Here is an overall view of the Placerville townsite with 5 of the proposed 9 major structures.  The San Miguel River will run along the edge of the bench work.  It should be noted that the store should be behind Warehouse A/B.  Unfortunately, there just wasn't enough room so it got shifted to the left.  The depth of the scene is 30".


The Residences

 September 11, 2023

Just to the north of the store, were two private residences on Front Street.  Both will have to be scratch built and their depths reduced due to the available space, about 2 inches.  The Sept/Oct 2015 issue of the Gazette has a nice article by Steve Harris on building these two structure in HO Scale.  Unfortunately, the article only included a set of Bruce Blazek plans for the smaller of the two. 
 
                                                                                        
                     Denver Public Library Photo                               
I decided to start with the more difficult of the two houses.  Since I didn't have any plans, I made several drawings and when I got one that looked about right, I transferred the dimensions onto a piece of styrene and cut it to shape.  I left a couple of scale feet on the bottom to start with.  After I took this photo, I trimmed off a scale foot (first line above the bottom).

 
The window openings were cut out of the styrene and the clapboard siding was glued in place with ACC.  The wall was then turned over and the window and door openings in the clapboard siding were cut out from the back side.  The windows are modified Tichy parts and the door is a Grandt Line part.


September 13, 2023
 
Here is a picture of the finished model.  I couldn't find a color picture anywhere so I chose a weathered cream for the siding and a light gray for the trim work.  Builders In Scale Silverwood was applied first, allowed to dry, and followed by cream craft paint applied with a really "Dry" brush.  The peel and stick shingles are from AMB and chimney is from Rail Scale Models.


The Truck Dump


One of the things I noticed while studying photos of Placerville (Page 178, RGS Story Vol X) was the truck dump that shows up in the following enlargement.  The quality is poor, but it appears that it was used to dump ore from small mine operators into gondolas.  The photo was taken in 1947.  I think the small structure to the left and behind the dump is the scale house.  I plan to include the trump dump and scale in my Placerville scene.  Any additional info regarding the truck dump and/or the scale, or photos, would be greatly appreciated. sdepolo@outlook.com


Looking For Backdrop Photos

 
The backdrop for Placerville may turn out to be a problem.  The canyon is pretty narrow through Placerville and when I was there, I couldn't find a suitable vantage point to take a series of photographs that could be stitched together in Photoshop to create the backdrop.  If anyone has a source of suitable photographs, please let me know.  sdepolo@outlook.com

As always, your comment, suggestions and questions are welcome

Friday, September 8, 2023

Construction Update #4 - RGS #40, Layout Construction, The Placerville Store & Sn3 Items For Sale or Trade

RGS 40

 
The latest addition to the roster is RGS #40.  This is a P-B-L Foreground Model.


Layout Construction Begins
September 3, 2023

The HO layout along the 22' long north wall has been removed and the first three modules for Placerville are being installed.  The modules are resting on the existing L-Girders that were originally built in 1987.  They've been reused on 6 prior layouts, in 4 different scales; HO(2), O, On3 and Sn3(2) and at three different locations.  One thing is pretty clear at this point.  My RGS 1st District is going to have a very low track to scenery ratio.  Placerville consists of the mainline, a double ended siding/house track, a single ended spur and a wye along a 22' long wall.

The first module, a corner module, is shown below.  The Placerville wye will be located on this module.

 
Placerville will be located on the next two modules.  They are 96" x 30" and 84" x 30" and located along the north wall of the room.  The modules, which are not attached to the L-girders, are held together with lag bolts.  The 2" foam will rest on the cross members.


And where is whats left of the HO layout...  In the bed of my 26 year old Ram pickup ready for a trip to the transfer station.  The old Dodge V-8 is a gas guzzler compared to my F-150 but with nearly 170,000 miles, it still doesn't use a drop of oil and runs great.


The Placerville Store

September 5, 2023
 
 
To effectively duplicate Placerville, I want to include a minimum of 9 structures; the depot, the 2 warehouses, the store, the garage and the post office, 2 residences and a hotel.  The count doesn't include several minor structures to include the depot outhouse, various sheds and a small warehouse.
 
I have just finished the store from Monster Modelworks.  The store, built from stone block, is generally referred to as the Whitley & Whitley.  Here is a picture of the finished model from the Monster Modelworks web page.  The model appears to be a very close reproduction of the prototype.

 
Due to the fact I only have about 4" in depth to work with between Front Street and the backdrop I had to shorten the length of the side walls by a little over 5 inches.  And, since the store is going to back up directly against the backdrop, I decided to save the back wall along with what was left of the side walls for a future project. 

Assembly is pretty straight forward.  It took me about a half an hour to cut down the side walls, square up the edges, and glue things together.  The laser cut(wood) stone block walls are pretty impressive.


I only ran across one small problem during the build.  The slots for the awning supports didn't line up properly. 
 
 
I opened up the small notches and then glued the supports in place.  Once the awing is glued to the front of the store, you won't be able to see the fix.


After reviewing some pictures on the internet, I decided to go along with the light gray or white trim colors suggested in the instructions.  The roofing, on the awning, must have been replaced or painted green at some point in time.  After due consideration, I settled on light gray trim and the rusty seamed roofing as shown in the Monster Modelworks photo.  I finished the stonework starting with Builders In Scale Silverwood and then proceeded to dry brush on three more colors of craft paint.  The overhang roof was rusted with powdered paint pigments.  The prototype is cool, the kit is great and it was easy to build.  Monster Modelworks has a bunch nice structure kits in all the major scales. https://larkspurlaserart.com/structure-kits/

Here is a picture of my completed model less a few details.


The Garage

September 6, 2023


While working on the Placerville Store, I got to thinking about the left over parts and the stone block garage that is and was located on Front Street about a block and a half east of the store and behind the depot.  Since all I had to work with was about an inch of depth, all I really needed was the front wall that faced Front Street.  My starting point was the picture of the finished garage kit off the Monster Modelworks web page.


I laid out the material left over from the store, made a few cuts, came up with the front shown below. 

And then, a little late I might add, I decided to look for additional pictures of the prototype on the internet.  Both the store and the garage are still in use.  Turns out, the Monster Modelworks kit captures the feel of the prototype but is by no means an accurate reproduction.  The prototype, shown below, is obviously much larger, has a window to the left of the garage door and the entry door is offset to the left of the window.  The steps along the roof are also different.


Since I couldn't increase the width of my garage, I cut off the upper most step on the top of the wall and narrowed the garage door by about 2 scale feet.  The changes make the building seem wider even though it is actually 2 scale feet narrower.  The windows also had to be downsized.  In the spirit of compromise and "good enough", and the fact I didn't have room for the prototypical sized windows, I cobbled together the windows using parts from Grandt Line baggage room doors and Tichy windows.  The entry door is a Tichy part.  There's still a lot to do.  The scratch built garage doors need to redone with horizontal boards and  lintels need to be added above the doors and windows.  Hopefully a sign will help cover the seem where the two wall sections join.
 
Not sure about the trim colors circa 1940 so I went with green. I think when it's all said and done, my version lies somewhere between the prototype and the Monster Modelworks Placerville Garage kit.


Sn3 Models For Sale or Trade


The following models are part of my personal collection of unique Sn3 rolling stock.  The shipping cost for each model is an additional $7.95 (US Postal Service).  All models subject to prior sale.

Copper River & Yukon #569

 
This CR&Y box car is an ex RGS/C&S car that came off the late Brian Ellerby's Copper River & Yukon.  It was probably built from a Overland Kit. $75.00 or Best Offer. SOLD
 
 
Alyeska Mines #905 is another car off the late Brian Ellerby's Copper River & Yukon.  Originally there were four of these cars on the layout and they show up in a lot of photographs of the layout.  They were kit bashed from HO-Scale 2-Bay Hoppers.  I don't know who built them.  Originally, I had 3 of the 4 cars.  I sold one and this is one of the remaining 2.  I don't know where the 4th car ended up.  The Alyeska Mines Railroad connected with the CR&Y at Caribou.  $75.00 or Best Offer. SOLD
 

Alyeska Mines #034 is a box car converted for hauling copper ore on the CR&Y.  I built two of these, shortly before Brian's passing, to go along with a couple of similar cars that were already on the layout.  $75.00 or Best Offer.
 

CR&Y #6041 was also purchased during the Brian Ellerby estate sale.  For reasons unknown, the reporting marks were removed.  Decals will be included to replace the missing "CR&Y".  I believe this car was also built from a Overland C&S kit.  $45.00 SOLD

 
Alaska Pacific #309 is a ex Overland Models brass C&S caboose.  A new under frame was built to accommodate a pair of 4-wheel caboose trucks.  The original under frame is included in order to convert it back to the C&S configuration along with the original box. $125.00 Sold
 

 Alaska Pacific #306 is another ex Overland Models brass C&S caboose. It too has a new under frame and 4-wheel trucks.  The original under frame and original box are included with the sale.  $125.00  SOLD
 

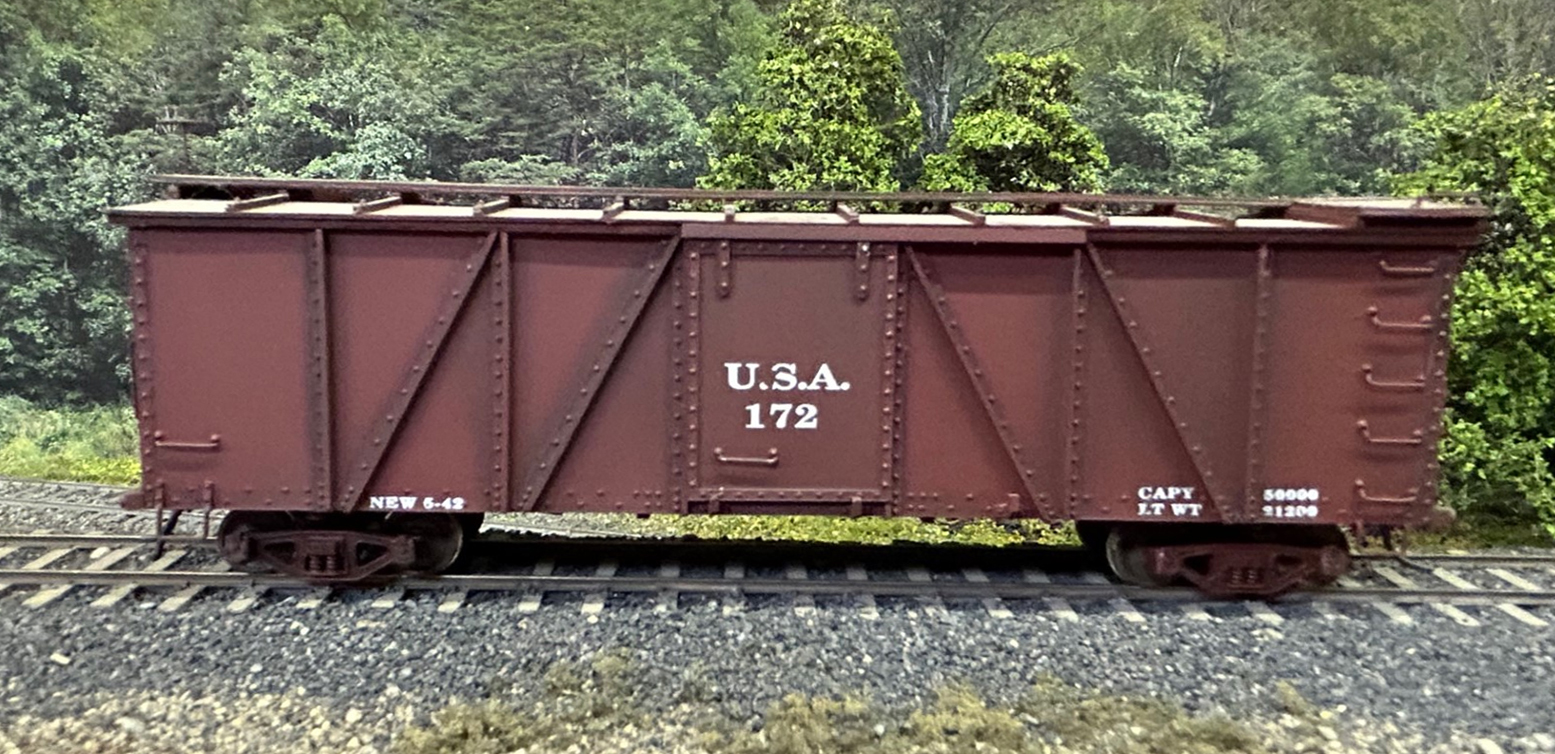
USA #172 is a rather unique car.  It was built for my Alaska Pacific using a resin kit for an all steel East Broad Top box car kit.  $75.00 or Best Offer.
 

 As always, your comments, suggestions & questions are welcome

Wednesday, August 30, 2023

Construction Update #3 - Weathering Warehouses, Goose #3 & Sell or Trade

Weathering the Warehouses

 
The two warehouses for Placerville are now weathered and just about ready to be placed on a module.  Except for the roof, Warehouse A/B (Oxide Red) didn't receive much weathering.  The roof was weathered with powdered paint pigments, rust, brown and black, and given a coat of Tamya Flat. 

Warehouse C received heavier weathering.  It was given a dark brown wash with acrylic craft paints and a coat of Tamya Flat followed by powdered pigments; rust, brown, gray & black.  And before anyone comments, the doors are only temporary until I can find or make doors closer to the prototype.


RGS Goose #3

 
RGS Goose #3 is an old PFM Import.  It was previously lettered for a private road name so I did my best to remove the old lettering without doing to much damage to the existing paint and Thin Film decals were used to apply the RGS lettering.  At some point I will probably strip the existing paint and redo it.

 
While the PFM Geese aren't quite as nice as the more recent imports from P-B-L, they can be turned into excellent running models.  The main problem with both versions is that they are very sensitive to dirty track and wheels.  I solved this problem by adding contacts to the insulated wheels giving the model 8 wheel pickup instead of 4 and by adding a current keeper along with a Soundtraxx Tsunami2 DCC sound decoder.


 Caboose #403

 
While I have quite a bit of D&RGW rolling stock, I am a little light when it comes to modeling the RGS.  In the last week or so, I added the Overland Models RGS short caboose shown below.  I also picked up a P-B-L "Foreground" model of RGS 40.  I'll post a picture of #40 in the next update.
 

Sn3 Equipment For Sale or Trade

 
Since I am going to model the RGS 1st District as closely as possible, I have at least one locomotive, some rolling stock and several structures that I would like to sell or trade.  If you are interested, please contact me at sdepolo@outlook.com  
 
P-B-L D&RGW K-28 #476 is a September 1988 "Foreground" model.  I would prefer to trade, rather than sell, for a P-B-L K-27 "Foreground" model built about the same time.
 
 
I scratch built the depot shown below about a year ago when I was planning for another layout.  It is based upon the Cumbres depot but it is not a perfect match.  The depot is wood over a styrene core with Buildiers In Scale shingles.  Colors are Floquil Depot Buff with a little white added and Floquil Roof Brown.  The overall dimensions are 9" by 7.5" including the platform.  The figure a platform details are included.  The depot and platform are mounted to a .080" sheet of styrene.  Make an offer or trade.


The Idaho Hotel - Built from Bar Mills Kit.  $225.00 or trade.


Looking for the following 

  • P-B-L RGS 2-8-0 #41
  • Vance Junction Section House (Banta)
  • Ophir General Store (Banta)
  • Ophir Mrs Skillens Store (Banta)
  • Ophir Tram House (Banta)
  • Ophir House At The End Of The Trestle (Banta)
 
 As always, your comments, suggestions and questions are welcome


Thursday, August 24, 2023

Construction Update #2 - The Warehouses at Placerville


The Flour, Feed & Ore Storage Warehouse

 
There were two large warehouses at Placerville.  Both have been gone for over 20 years.  The warehouse to the north of the depot held feed and flour on the northwestern end of the building and the smaller addition to the southeast was used to warehouse ore.  These are referred to as Warehouse A and Warehouse B on Page 271 of the RGS Story, Volume 1 (Don Abbott drawing, Sundance Publishing).  There is also a set of plans, without dimensions, on Page 280 (Mike Blazek) in the same volume.  It should be noted the plans and the limited number of photographs available don't always match up.  Obviously, the building changed over the years.  Regardless, I studied the plans, the pictures and built the core for my best guess version of Warehouse A/B using Evergreen styrene.  The overall length of the building is 19" or about 102 scale feet.
 
 
The sides and roof were covered by an overlay of Evergreen Styrene corrugated metal siding/roofing material.  2"x12" scale lumber, stained with Silverwood, was used below the siding and for the loading dock.

 
In keeping with my intent to mount most if not all of my structures on a 1" pink foam base, here is the base for Warehouse A/B.  The foundation is 3/16" square strip wood glued to the base.  The cork roadbed in the foreground is for the double ended house track/siding that ran behind the depot.  The other section of roadbed is for the single ended spur that serviced the warehouse.
 

Color seemed to be another variable.  Again based upon the limited amount of information available, I chose to paint the structure oxide red with Rust-Oleum 2X Ultra Color purchased from my local Ace Hardware.
 
 
In the previous post, the Fast Tracks "Tie Jig for Sn3 Mainline - Slightly Misaligned" was used for the mainline in front of the Placerville Depot.  That jig was also used for the siding/house track that ran behind the depot.  For the spur servicing Warehouse A/B the Fast Tracks "Tie Jig for Sn3 Branch Line - Moderately Misaligned" was used.

 
Both sets of ties were stained with Silverwood and then the ties on the warehouse spur were aged with a very light wash of Floquil Earth.  The ballast is a blend of High Ball Cinders and screened paving sand from Home Depot.  A little ground foam finished off the mini-scene.  More details and rail will be added when the warehouse is set into the module.


The RGS Warehouse


The RGS Warehouse was located behind and to the southeast of the Placerville Depot.  This warehouse is referred to as Warehouse C in the Don Abbott drawing in Volume 1 of the RGS Story.  Warehouse C didn't have it's own spur; it was located along the siding/house track that ran behind the depot.  My best guess model is 16" long or about 85 scale feet. I built this structure, using the same methods as outlined above with a full length loading dock.  At some point after 1940 most of the dock was gone and all that remained were short sections of crumbling remnants.  Apparently, around 1940, all or portions of Warehouse C was leased to General Petroleum.
 
 
And here are all three structures arranged how they will be placed on the layout.  Warehouse C has been placed on a new larger piece of pink foam.  It still lacks ballast, ground cover and warehouse doors.  Both warehouses still need weathering.  The depth here is about 20" leaving about 10" for Front Street and a few building flats placed against to the backdrop.
 

As always, your comments, suggestions & questions are welcome