North Placerville
The Scale House
May 2, 2024
I really like doing scenery work and as I have previously mentioned here in the blog, I usually start with a structure or other key element and work out from there. Here is the scale and scale house on the north end of Placerville. The scale house is scratch built with a styrene core overlaid with scribed wood siding and Grandt Line doors and windows. I prefer injection molded doors and windows from Grandt Line or Tichy over the laser cut wood peel and stick windows found in most of the current craftsman style kits.
Hardware Store & Miner's Supply
These two structures are across Front Street from the scale house. Both of these structures were built from Wild West Models kits. The one on the left, built by Bruce Hanley, is "Harvey's Hardware". I built the "Miners's Supply" on the right.
Drainage Ditches & Culverts
One of the things I could have done better on previous layouts was to pay better attention to modeling how prototype railroads deal with drainage. Poor drainage is a real problem for railroads since it leads to erosion and costly repairs. On a model railroad adding drainage ditches and culverts not only replicates the prototype and adds interest.
The culvert shown in the photo on the right is from Grain Belt Models. I found out about these culvert pipes from my friend and fellow modeler Kurt Boyd. They are available in multiple scales.
The Placerville Cafe-Bar
Here is the cafe-bar sitting in it's future location. I decided to replace the shingles provided with the kit with some "peel & stick" versions from Rail Scale Models. I am also building the McCarville Studios Placerville gas station to go along with the cafe-bar. It will be located to the left of the cafe-bar. Progress has slowed when it comes to building structures. A pulled muscle in my back makes sitting at my work desk difficult.
The Placerville Gas Station
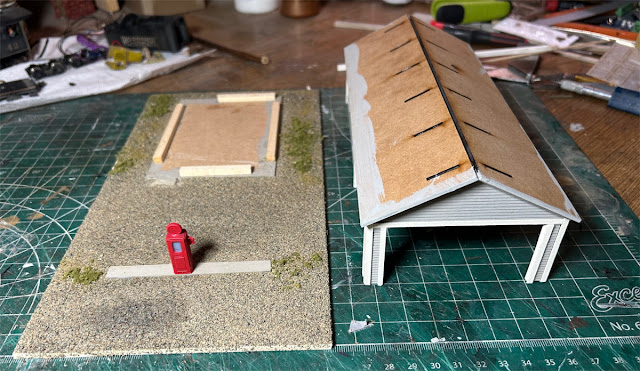
While I was waiting for the cafe-bar shingles to arrive, I decided to start on the Placerville Gas Station kit from McCarville Studios. As mentioned in a previous post, I prefer to do as much of the assembly before the walls are installed on the base. Here are the parts laid out on the desk. Since I like to give every thing a coat of flat before the window glazing is installed, the glazing is one of the last things I do.
Here is a photo of the "almost" finished gas station. I did add some additional trim work on the canopy section which is not called for in the instructions (Yes, the removable roof is on backwards in the photo).
The kit includes some corrugated metal roofing. I decided not to use the material provided in the kit because the corrugations looked under size to me. I checked a piece of actual corrugated metal and the corrugations were a little over 2.5" apart. I think the material provided in the kit looks about right for HO Scale. As a result, I decided to use the S-Scale material available from Wild West Models. I think it is a little oversize but it is much easier to work with and I think it looks better.
Most of the structures on the First District are mounted on a piece of styrene, hardboard or pink foam before they are installed on the layout. I glued the floor to the base, added some strip wood to hold the building in place and glued down a bit of ground cover. The pump island was also glued to the base. When I have finished detailing the pump, it will be centered on the island and glued in place.
May 9, 2024
The corrugated roofing was cut to length and attached with double sided tape. I am still using the double sided tape I purchased from Ragg's... To Riches about 10 years ago. Similar tape is currently available from Wild West Models. The tape has a aggressive and permanent acrylic adhesive. The tape is expensive, about $16 a roll, but it is worth it! The Wild West roofing comes with a "silvery" finish. I didn't paint it; it was weathered with Bragdon powdered pigments.
The kit came with a piece of what looks like fishing line for the pump hose; bronze wire was used instead. The graphics came from a Micro Scale decal sheet I found in my box of "left overs". The 55 gallon drum is a Tichy part. I also replaced the stack with one from my parts bin.
The gas station on the left, the cafe-bar on the right, temporarily set up in their final locations on the layout. The replacement shingles have arrived from Rail Scale Models so they will be installed on the cafe-bar this coming week. On the prototype, the gas station was located to the west and on the opposite side of the tracks from the cafe-bar. Due to a lack of space coupled with the desire to include these two interesting structures, they ended up here along the main line. The spur leading to the stock pens and oil distributor is in the foreground.


No comments:
Post a Comment