Friday, August 30, 2024

Construction Update #38 - Bridge 45A


August 11, 2024  

The base for Bridge 45A was built from 12 ply Baltic Birch plywood.  Although it is expensive, it doesn't warp.  In addition, it will be sealed polyurethane as an added precaution against warping.  The ends and four of the intermediate bins have load bearing Baltic Birch supports.  The other bents will just be resting on the pink foam scenery base.   The bridge itself will sit between guides on each end so it can easily be removed while doing scenery.  The base, while it will be screwed to the bench work, can also be removed.  The level was used to insure the are no peaks and valleys in the bridge deck while measuring and installing the bent supports. 


Once the base module was finished, some minor changes had to made to the existing bench work.  A small section of  existing L-Girder joist had to be removed and two others joists had to re-positioned.  After the cuts and moves were made, everything was secured with clamps and the re-positioned joists glued in place.

Here is the bridge temporarily set in place.  Pink foam was used to make additionall non load bearing bent supports.  Vance Junction is on the other side of the scenic divider.

August 14, 2024

The tallest bent sat in the middle of the river on a concrete footing/base.  I couldn't find a good picture of the concrete footing so I came up with a plausible design, built it out of .060" styrene and painted it gray.  It still needs some weathering. 

August 16, 2024

The last couple of days have been spent filling in the terrain profiles with pink foam.  Here is the current state of the terrain looking south towards Ophir.

  A view looking from the north to the south.

Here's another view looking south.  The river (center) will drop through a series of water falls before it passes under the bridge.  Since I have never attempted modeling any form of moving water, I'm probably going to need some experienced help. 


 And here is a photo taken from the end of the peninsula looking south.  Ophir is in the distance. 
 

August 30, 2024

Back from vacation.  I have gone over how I do basic scenery in previous posts so I'm not going to go into a lot of detail here.  Basically I use cardboard webbing over foam profiles covered by red rosin paper, plaster cloth and Sculptamold.  The one thing I did do new was to use gap filling expanding foam to fill in between the pink foam bridge fittings.  In the past I would have probably used newspaper covered by plaster cloth but I haven't purchased newspaper in years.


Once it has cured, about 24 hours, the expanding foam was carved back to match the surrounding terrain.

An overall view of the cardboard lattice covered with red rosin paper.

And with a layer of plaster cloth.

.

As always, your comments, suggestions & questions are welcome

Saturday, August 10, 2024

Construction Update #37 - A Caboose Track for Ridgway, Trestle 45A and The OIlton Club


Compromising the Prototype

August 4, 2024

Model railroads, based upon a prototype, are always a compromise.  Space is normally the limiting factors but there are others.  

Placerville, Vanadium, Vance Junction and Ophir on my 1st District were all planned to be reasonable representations of the prototype. The remaining scenes, most notably Ridgway/Dallas, were not.  While space was a consideration when including and/or changing the "not so accurate" scenes it wasn't my  primary motivation... Operations were.  Unfortunately, the prototype with it's meandering scenic mainline, abundant charm, rustic character and refusal to succumb to economic reality, was nearly devoid of meaningful on line traffic through most of it's history.  As a result, those not so accurate scenes all have one thing in common.  They all include plausible online shippers that can contribute car loads to my version of the 1st District.

Which gets me back to Ridgway...

The Ridgway Caboose Track

To the best of my knowledge, the Ridgway yard never had a dedicated caboose track.  From the photos I've seen, it appears the RGS used one of the storage tracks near the roundhouse and turntable to store and possibly service cabooses between runs.  Since my operating plan will require the prototype's four caboose plus several loaners from the D&RGW, I have decided to add another one of those "not so accurate" elements to the "not so accurate" Ridgway yard; a caboose track.  

The proposed location for the caboose track.  Since I love cabooses, its right up front!  Now all I have to do is come up with about 3 sections of HO-Scale cork roadbed.

Bridge 45A

August 5, 2024

The bents and deck stringers were finished up back in April and yesterday my son Andrew and I found time to cut the lumber for the Bridge 45A's removable base.  As a result,  I thought I should get back to to working on the the bridge.  The 45A bridge deck will require about 275 ties.  Gluing all the ties is a slow and tedious process.  At my current pace, it's going to take 3 or 4 hours over several days to complete the job.  Including the ties, I have cut and stained over 900 pieces of scale lumber for this project.

August 7, 2024

With the bridge deck finished, it was time to start attaching the bents.  I find flipping the deck over and attaching the bents from the bottom is the easiest way to build one of these bridges.  Since the bridge will be on a 2.5% grade one end of the deck was elevated a inch and a quarter on one one end. The bents are then installed perpendicular the to the desk, not the bridge deck.   

Here is the first bent waiting for the glue to dry.  Building the assembly fixture and bents was covered in updates #20, #21 and #24.
 

I have to give the glue about an hour to set up until I can go on to the next bent.  Here is an overall view of Bridge 45A on my desk.  The bridge will be 280 scale feet long (52.5") and about 90 scale feet above the river bed.  The prototype was 466 feet long and the deck was 93 feet above the riverbed.  I modeled the bridge as it appeared after the 1914 rebuild when the original 108 foot Howe-truss that spanned the river was replaced with bents in order to accommodate heavier locomotives. Heavier stringers were used in the center section and the bents were spaced further apart; 20 feet instead of 16.  On the model, I reduced the spacing by 2 scale feet to make the bridge appear a little longer.


August 8, 2024

Here is the "almost" finished bridge sitting on my desk.  I made a mistake when I built the three bottom bents.  They sit on an angle, parallel to the river, so they needed to be about 5 scale feet wider than I built them.


August 9, 2024

The bents were cut, stained and laid out to dry.  The two on the left, will be doubled up and sit in the riverbed on concrete footings.  The two on the right, one above the other sit on the opposite banks.  The Howard Fork of the San Miguel River, at this point, is entrenched about 20 feet below the surrounding terrain and dropping quickly from the east to west below the right of way at an angle of about 70 degrees.


 August 10, 2024

The bents ready for installation on the bridge... I thought.  The bracing shown  one on the middle right bent is not typical of RGS trestles.  But, there were exceptions so the question is do I rebuild it or live with it?

Here are a few pictures of the finished bridge ready to install on the base.  Since RGS bridges were held together with drift pins and bridge nails, with the exception of the sills, no nut and bolt details were added.  While nuts, bolts and washers were use to hold the sills together, they are not readily seen from the bridges normal viewing angle so they were left off the model.


The House at the End of the Trestle

This little house was situated at the south end of the trestle.  This is another one of those Bruce Hanley built structures.  I'm going to repaint the white siding to tone done the weathering and better represent the structure during the early 1940's

The Oilton Club - Ophir

August 9, 2014

I recently had the opportunity to purchase a built up version of the Oilton ClubBased upon the information supplied by the seller, I believe the model was built by Bill Banta of Banta Model Works.  It is a very nice model but I'm not sure about the color.  While it may be right for the period I model, it appears in photos to have been painted white during the last few years of operations.   

Currently, it is the last structure standing in the area.  A highway was built through the area and for all practical purposes obliterated any remaining traces of the RGS.  According to a post on the internet, it is currently a gift shop and personal residence.


Here is a picture of the model.  I don't think attempting a repaint would be a good idea.  What do you think?

As always, your comments, suggestions and questions are welcome.  I read them all and respond where appropriate.

sdepolo@outlook.com 

Location and views through the first week of August. 

United States 204
Australia 15
Canada 6
France 3
Hong Kong 3
Switzerland 2
Singapore 2
United Kingdom 2
Russia 1
Spain 1
Other 1

.

Saturday, August 3, 2024

Construction Update #36 - DCC Turntable Control, The Mill at Dallas and the Backdrop Photo Mural.


Turntable Control

July 29, 2024

The Ridgway turntable was built from a Kittridge Hill Models kit.   I built the kit per the instructions and installed the recommended gear reduction motor that is sold on ebay ($15.00).  The motor works fine but there is some slack in the drive that takes some getting used to.  And, there is no provision for indexing.  On the old layout I used a constant 6 volt power supply with a simple on/off switch that added to the difficulty in getting the turntable to align properly with the lead tracks.

At some point I would like to power the turntable with a NYRS PT4C turntable indexing system but that will have to wait until I can budget the cost ($525).  In the meantime, I decided to try using a Digitrax mobile decoder left over from an old sound conversion project; in this case a DH126.  The variable speed control slows the turntable rotation to the point where you can barely see it moving and make "eyeball" alignment much easier.  It will do for now. 

I cut off the extra wires (lights etc.), gave the decoder an address of "99" and wired the red and black wires directly into my power bus.  The gray and orange wires (speed control) were hooked up to the turntable motor.  The decoder was left to hang freely from the power bus beneath the layout.

The project was finished off with a temporary DCC address label on the fascia.  Eventually, I'll run the control bus out to this location and permanently assign one of my old non-radio tethered throttles to control the turntable.


The Mill at Dallas

July 29, 2024
 

Accessing the mill required an additional spur.   In order to add the spur, the Ridgway yard track closest to the aisle was cut back a couple of feet and a turnout was installed. .

Since I couldn't find any cork roadbed for sale at anything close to a reasonable price, I decided to use some old Homosote roadbed I had on hand.  It was glued in place with carpenter's glue.

During the process of installing the roadbed, I did manage to knock a flatcar and gondola off the layout and onto the floor.  The gondola received some minor damage.  The flatcar is going to need some work.   

Here's how things looked with all the roadbed in place.The mill is going to add a significant amount of traffic since all of the inbound and most of the outbound traffic will be routed south over the 1st District.

July 30, 2024

The track was glued in place with Polyseamseal and painted with a combination Rust-oleum camouflage sand and dark earth brown spray paint.


 The Dallas Mill Loading Dock/Platform

The base for the loading dock/platform was made from a piece of Woodland Scenics sheet foam.  The Northeastern Scale Lumber strip wood was purchased in bulk from Walthers and stained with Builder-In-Scale Silverwood.  The Northeastern scale lumber is not as nice as the material I get from Mount Albert but for a rough sawn platform this is an advantage.   Craft paint was used to paint the base.

July 31, 2024

The lumber was cut in 8 and 16 foot lengths and glued in place with tacky cement.  This is a tedious process.  Here, I'm into the process about 3 hours and I am about 1/3 of the way finished.  The boards will not be placed in areas the structure(s) will cover


The Dallas Backdrop

July 31, 2024

I finally had to break down and put up the backdrop behind Dallas.  It turned out to be a pretty simple job.  I'm not entirely happy with the result but it was the only way I could come up with a way to separate Dallas from Old Placerville.  The archway was cut into the valance to keep me from smacking my head during an earlier phase of construction.  At the time, the module Dallas is sitting on could be easily removed... Not so much anymore.  The 23 miles between Dallas and Old Placerville has now been reduced to about 6".


Back to The Mill at Dallas

August 2, 2024

The roof of the mill was a little rough so I decided to make a few repairs and give it a fresh coat of paint.  It still needs to be weathered.  

The loading dock/platform is also finished.  It took over 60 linear feet of scale lumber, cut into bout 275 individual pieces, and 5-6 hours spread over a couple of days to complete the project.  The roof still needs to be weathered and a couple of smoke stacks need to be replaced.  The LED light strip also needs to be added above the scene to eliminate the shadow cast by the valence.


The Photo Mural for Ridgway/Dallas

August 3, 2024

As mentioned in a previous post, the phtoto mural for Ridgway/Dallas was created by Dale Krutzer and printed by Dave Wike.  Although the mural includes the sky, I prefer to cut it away in favor of a painted sky.  A sharp Exacto knife, extra blades, care and patience are required for this process.  I leave a tab about 1" by 4" every 6-8 inches in order to tape the mural to the back drop for a test fit before permanently gluing it in place.  A little blue showing through the trees at the top of mural is OK.  You won't see it once the mural is on the blue wall.  Using this method, installing the mural is easily a one man operation.

Here is the mill with 26 feet of photo mural temporarily taped to the backdrop.  Test hanging insures the mural is level and closely aligned with the bench work.  Any minor gaps between the mural and the bench work will eventually be covered by ground cover, shrubs and a few trees. 

At this point it should be noted that while I prefer spray adhesive (3M Super 77), wall paper paste can also be used to attache the mural.

Starting from the far left, the photo mural was rolled back up towards the center of the backdrop.  The tape and the tabs were removed during this process.  I stopped near the mid point leaving half the mural, tabs and tape in place to maintain the alignment.


Reversing direction at the midpoint, the mural was glued in place by unrolling it about 2 feet at a time, spraying the back side of the mural with adhesive and attaching it to the wall.  A piece of cardboard was used to cover the previous 2 or 3 feet of mural to protect it from any possible over spray.  When the first half was finished, the process was repeated for the second half starting at the midpoint and working to the right.  The entire process took about 3 hours.  The mural did drift a little towards the bench work on both ends; about 1/4 inch on the left end and about 1/2 inch on the right.

Here is a series of photos starting at the Ridgway engine servicing area and ending in Dallas.

The Ridgway Yard looking railroad south.

The Ridgway Yard looking railroad north.

The Dallas mill.  Hopefully I can ge my artistic friend Kurt Boyd to come over and add some subtle clouds near the horizon.


 As always, your comments, suggestions & questions are welcome


Saturday, July 27, 2024

Construction Update #35 - The First Year In Review

Since the Sn3 RGS First District anniversary is coming up in August, I thought it might be nice to take a tour around the layout and see the first year progress starting at Ridgway and working our way south to Trout Lake.  As I am sure you will notice, I tend to jump around from one project to another.

Note:  If you have viewed the blog from the beginning, you may find this post a bit repetitive.

The Plan

Room Size 22 x 27 feet.


Ridgway 

During the first two weeks of  November 2023, I came up with a new plan for Ridgway.  In the original plan, Ridgway was to be represented by visible staging tracks where the roundhouse, turntable and storage tracks are currently located.  The Old Placerville fuel oil depot and stock pens were going to be where the yard is currently located. 

November 2023 - This is the way Ridgway looked.  At this point I had run out of P-B-L Sn3 flex and it was temporarily out of production.

The current state of Ridgway (July 27, 2024).  By the end of  November 2023 I had managed to get a small batch of flex from a fellow modeler followed by a second purchase at a local swap meet.


Dallas

Not much to say here as development here is only about a week old.  For more info, see my last post, #34.

Old Placerville

Revisions were made to Old Placerville at the same time the decision was made to include Ridgway. (November 2023).  At the time, the wye was removed and a staging track for Montrose was added.  The staging track was eliminated when Dallas was added to the plan (July 2024).

November, 2023 - This is the way Old Placerville looked.  The stock pens were built from two Banta kits before the layout was started.  The Texaco oil depot was built by Bruce Hanley from a Ragg's kit.  If anyone is interested, I have a Ragg's oil depot kit available for sale.

January 27, 2024 - All the track is in and operational.  Scenery has begun to creep around behind the stock pens. .

The Placerville Gas Station and Cafe Bar round out the Old Placerville scene.  They're not  in the right locations due to lack of space but I wanted to include them.  Both were built from McCarville Studios kits.  The assembly of these kits was covered in updates # 25, 26 & 27.


Placerville

Placerville was the first scene that really got developed on the layout.  Most of the structures were built prior to starting the layout in August of 2023.

October 2023 - The north wall.  Placerville was built on 3 modules.  7 of the structures were scratch built, 6 were built from kits.


June 2024

 
The 20' long backdrop behind Placerville was created by Dale Krutzer and printed by Dave Wike. 

The Placerville post office was scratch built, the Placerville garage was built with parts left over from the Monster Model Works Placerville store kit.  Both are about 2 inches deep.


The Placerville depot was built from a Ragg's...To Riches? kit.


Wilson & Vanadium


Wilson

November 2023 - Both Wilson and Vanadium are being built on modules along the east wall of the room (27 feet)  The RGS had a siding in Wilson but I couldn't find any pictures.  This is what I came up with.  The San Miguel River parallels the tracks on the left.


March 2024 - A spur was added in order to cross the San Miguel River in order to reach a small warehouse. The kit bashed section house and storage shed is based upon the one found at Pagosa Junction on the D&RGW.
 
 
April 2024 - The rock work was carved from pink foam and painted with latex house paint to match the prototype. The backdrop here is a hold over from my old HO layout.  It was made by Trackside Scenery.
 

The small warehouse on the near side of the river was built by Bruce Hanley.


Vanadium

November 2023 - Structures mocked up for the mill complex based upon a photograph.  I don't have nearly enough space to duplicated the prototype so I picked 5 key structures and built mock ups.  No additional work has been done.


Vance Junction

November 2023 - The first test train through Vance Junction.  All of my locomotives are brass imports from P-B-L and equipped with Tsunami2 decoders, TCS current keepers and TCS speakers.

December 2023 - The coal pockets.  The coal pockets at Vance Junction were built by Bruce Hanley.  These and several other fine structures were acquired from Bruce when he removed his layout.  No additional work has been done at Vance Junction but the kits are on hand to finish out this scene.


November 2023 - The curve between Vance Junction and Trestle 45A.  The minimum radius on the layout is 32", the maximum grade is 2.5%.  Eventually the Telluride Branch will branch off from the south end of Vance Junction, curve around behind the train and drop down to a hidden staging track between Ophir and Vance Junction.


Ophir

November 2023 - The first train crosses the future location of Brige 45A prior to arriving at Ophir.  All the components are built for the bridge and are ready to install.


And around the Ophir Loop.  No additional work has been done at Ophir.

June 2024 - Basic hard shell around Ophir siding.  The Aspen Grove, shown in the next photo is located in the cut just beyond the siding.

The "Cut" between Ophir & Matterhorn

 June 2024 - The rock here was gathered on Blewett Pass in the Cascade Mountains.

Matterhorn

June 2024 - The B Hanley Mining Co temporarily set it it's future location.

July 2024 - B Hanley Mining Company
 

The Montezuma Lumber Spur at Matterhorn

 
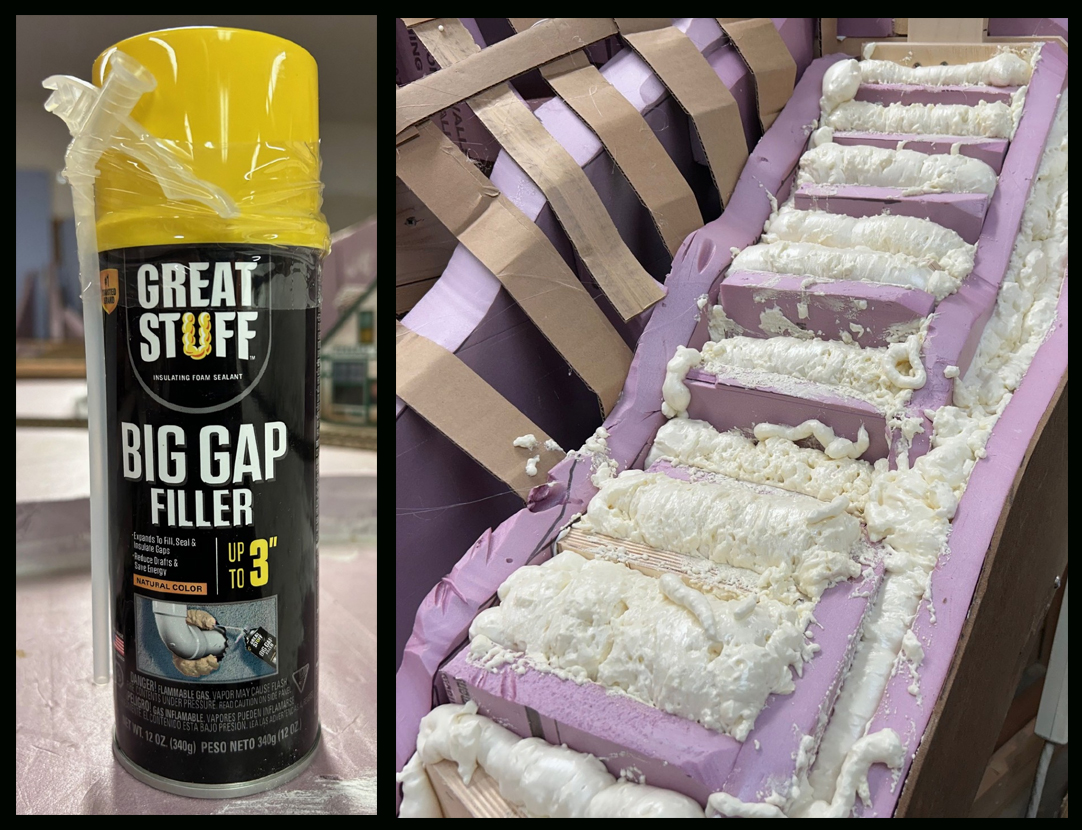
June 2024 - Matterhorn Siding.  Terrain was built up using pink foam profiles, cardboard webbing, red rosin paper, plaster cloth and Sculptamold.  Basic ground cover is paving sand from Home Depot.
 

July 2024 - RGS #42 at Matterhorn Siding.  The ballast is Highball HO "Cinders".


The Temporary Reverse Loop at Trout Lake

July 2024 - The reverse loop at Trout Lake will eventually be removed and the mainline will cross in front of the entry door on a lift/swing out, pass through the snow sheds at Lizard Head and enter the Rico staging yard on a shelf above Ridgway yard.

Progress to date is detailed in posts 1-34.  Your comments, suggestions & questions are welcome. sdepolo@outlook.com