Basic Scenery at Matterhorn
June 20, 2024
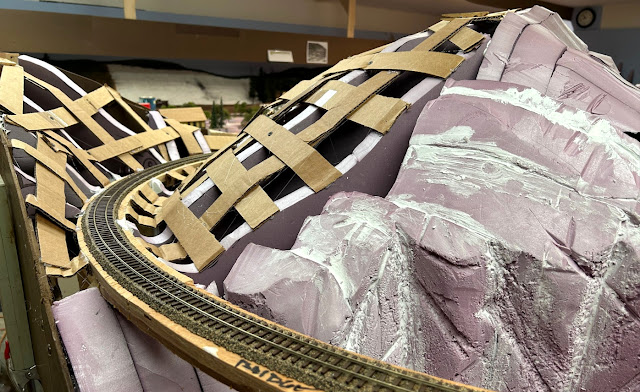
Basic scenery starts with pink foam profiles and cardboard webbing. The strips are cut with a paper cutter and held in place by a combination of hot glue. Close pins and sheet rock screws are used to hold the strips in place while the glue sets. Looking north, around the end of the peninsula, toward Ophir.
If you are going to try hand carving layers of pink foam, you will need to fill in the horizontal cracks between layers. If you don't, the unrealistic perfectly horizontal joints will show up after the foam is painted/stained. I use lightweight DAP spackling putty rubbed into the cracks with my fingers. Once painted, the cracks disappear.
I like to cover the cardboard lattice work with red rosin paper for two reasons. First, once it is applied it provides a pretty good preview on how things are going to look. And, it is easy to make changes if needed. Second, it provides some support for the plaster cloth that goes on next and reduces the amount of Sculptamold needed to cover up any of the webbing that may show through the plaster cloth.. I haven't tried it, but some modelers add a layer of carpenters glue over the red rosin paper and skip the layer of plaster cloth. Matterhorn siding south of the mine. .
June 21, 2024
The red rosin paper is covered by a layer of plaster cloth. I buy plaster cloth on Amazon. I prefer the rolls that are 6 inches wide and 180 inches long, I cut the roll to make pieces 6 inches by about 8 inches. The Amazon plaster cloth turns out to be about 1/2 the cost of plaster cloth from Woodland Scenics. Here is a link if you are interested... Link to Plaster Cloth on Amazon
And Ophir Siding?
It wasn't in the current plan to add the hard shell around Ophir Siding but since I was at it on one side of the peninsula I decided to go ahead and finish it off on the far side, The Ophir Siding siding looking south, around the end of the peninsula, towards Matterhorn.
Looking north towards the Ophir depot and spur. Another 4 rolls of plaster cloth were used to finish off the hills.
Sculptamold
June 14, 2024
The next step prior to painting and adding some basic ground cover (paving sand) is to apply a layer of lightweight Sculptamold over the plaster cloth. The Sculptamold serves two purposes. First, it fills in and contours the unrealistic areas where the cardboard webbing is showing through the plaster cloth. And second, it adds some texture and can used to duplicate scenic characteristics like erosion in cuts and fills.
About the only downside in using Sculptamold is the cost; it is relatively expensive especially when you buy it in smaller quantities. Buying it in bulk, a 25 pound bag in this case, lowers the cost considerably. There are some formulas on line for making your own Sculptamold. I haven't tried any.of them.
You do need to mix it in small batches as it starts to set within 5-10 minutes. Adding a little extra water or using very cold water will slow the setting time. Starting the mix with a clean container also helps. Any residual mix, left in the container when preparing a new batch, will "kick start" the new batch.
B Hanley Mining Co
B. Hanley Mining Company as of the end of the month.
As always, your comments, suggestions & questions are welcome


I have made my own Sculptamold substitute by using regular plaster and shredded paper insulation. I bought the insulation at Home Depot (the blow insulation type) Which is enough to last two or three lifetimes' worth of layouts.
ReplyDeleteI make it by mixing equal volumes of the paper and the plaster, and it works just the same as commercial Sculptamold IMHO.
I tried the generic plaster cloth but found that I needed two layers vs. one layer of the Woodland Scenics product for equivalent strength. I also typically brush on a topcoat of thin Hydrocal to provide some increased rigidity...
ReplyDelete