Sunday, June 30, 2024

Construction Update #32 - B Hanley Mining Company, Matterhorn, CO

Basic Scenery at Matterhorn

June 20, 2024

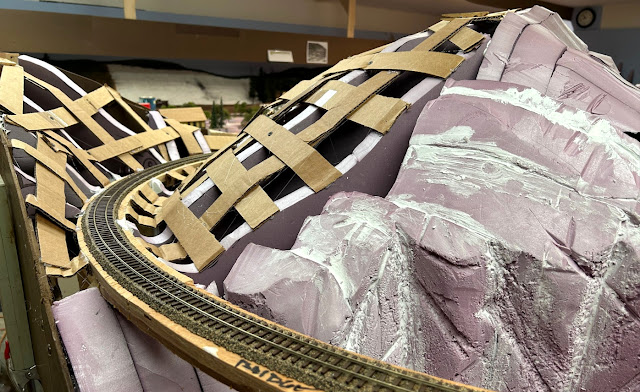
Basic scenery starts with pink foam profiles and cardboard webbing.  The  strips are cut with a paper cutter and held in place by a combination of hot glue.  Close pins and sheet rock screws are used to hold the strips in place while the glue sets.  Looking north, around the end of the peninsula, toward Ophir.

If you are going to try hand carving layers of pink foam, you will need to fill in the horizontal cracks between layers.  If you don't, the unrealistic perfectly horizontal joints will show up after the foam is painted/stained.  I use lightweight DAP spackling putty rubbed into the cracks with my fingers.  Once painted, the cracks disappear.


I like to cover the cardboard lattice work with red rosin paper for two reasons.  First, once it is applied it provides a pretty good preview on how things are going to look.  And, it is easy to make changes if needed.  Second, it provides some support for the plaster cloth that goes on next and reduces the amount of Sculptamold needed to cover up any of the webbing that may show through the plaster cloth..  I haven't tried it, but some modelers add a layer of carpenters glue over the red rosin paper and skip the layer of plaster cloth.  Matterhorn siding south of the mine.  .

June 21, 2024

The red rosin paper is covered by a layer of plaster cloth.  I buy plaster cloth on Amazon.  I prefer the rolls that are 6 inches wide and 180 inches long,  I  cut the roll to make pieces 6 inches by about 8 inches.  The Amazon plaster cloth turns out to be about 1/2 the cost of plaster cloth from Woodland Scenics.  Here is a link if you are interested...  Link to Plaster Cloth on Amazon

2 layers of plaster cloth were applied.  I used 6 rolls of the "Amazon" plaster cloth for a total cost of about $15.  Looking north, around the peninsula, towards Ophir.


And Ophir Siding?

June 23, 2024

It wasn't in the current plan to add the hard shell around Ophir Siding but since I was at it on one side of the peninsula I decided to go ahead and finish it off on the far side,  The Ophir Siding siding looking south, around the end of the peninsula, towards Matterhorn.

Looking north towards the Ophir depot and spur.  Another 4 rolls of plaster cloth were used to finish off the hills.


Sculptamold

June 14, 2024

The next step prior to painting and adding some basic ground cover (paving sand) is to apply a layer of lightweight Sculptamold over the plaster cloth.  The Sculptamold serves two purposes.  First, it fills in and contours the unrealistic areas where the cardboard webbing is showing through the plaster cloth. And second, it adds some texture and can used to duplicate scenic characteristics like erosion in cuts and fills.   

About the only downside in using Sculptamold is the cost; it is relatively expensive especially when you buy it in smaller quantities.  Buying it in bulk, a 25 pound bag in this case, lowers the cost considerably.  There are some formulas on line for making your own Sculptamold.  I haven't tried any.of them.

You do need to mix it in small batches as it starts to set within 5-10 minutes.  Adding a little extra water or using very cold water will slow the setting time.  Starting the mix with a clean container also helps.  Any residual mix, left in the container when preparing a new batch, will "kick start" the new batch.

June 30, 2024

B Hanley Mining Co

B. Hanley Mining Company as of the end of the month.


As always, your comments, suggestions & questions are welcome

sdepolo@outlook.com


Thursday, June 20, 2024

Construction Update #31 - B. Hanley Mining Co. at Mattahorn, Fascia, Station Names & Elevated Platforms

The Base - Mine & Ore Bins

June 12, 2024
 
There were several mines and at least two mills in or around Matterhorn.  The largest was the San Bernardo Mill located along the RGS at Matterhorn.  Building a model of the prototype mine, mill and supporting structures really wasn't an option; there just isn't enough room.  Most of the mining structures at Matterhorn were built by Bruce Hanley.

Back in January a base was built for the mine and it, along with the mine components, found a home on the chair in my work room. And there it sat for five months, gathering dust, waiting for me to figure out how it was going fit in the available space.  The plan was to reconfigure the spur, make room for the tailing dump, and install the complex on my layout just as it had been installed on Bruce's layout.  Once the base was on the layout room, I decided to extend the existing spur and shorten the trestle leading to the tailing dump. 
 
The revised trestle leading to the tailing dump dump required taller bents.  I built three.  (Only two were used)..  They were built to match the existing bents.  One has a retaining wall built into it to prevent the tailing pile from spilling out on to the mine spur.

Here is the base set in place on the layout.  The power house and tailing pile will be on the near side of the spur (plywood).  The mainline is in the foreground curving around the end of the peninsula to the left towards Ophir.

June 15, 2024

Here is the scene with the base and structures temporarily set in place.  .

Basic Land Forms around Matterhorn

June 19, 2024

Looking north at the end of the peninsula.  Ophir siding is just around the bend behind the hill, on the right.  The trestle location shown in the next photo is just to the south.

The future location of two trestles.based upon a couple on the "High Line".

Looking south, the mine will be on the left and the Montezuma Lumber Spur is on the right.  The hills in the distance are just high enough to obscure the Ophir siding which is on the other side of the peninsula.

Here's a view looking north.  The Ophir siding is right on the other side of the hills on the right.  The little dock/open sided shed, another structure built by Bruce Hanley, is on the Montezuma Lumber spur. 


Station Names and Fascia

June 19, 2025
 
While I was wandering around the Dollar Store, I came across some small picture frames that I thought might work to hold and protect the 1st District station names on the fascia.  The signs were created in Excel and cut to fit the frames.  The frames cost $1.25 each.
 

There are lots of options when it comes to fascia color but I decided to test a low lustre dark gray.  


Platforms for the Vertically Challenged

June 16, 2024 (Father's Day)

I'm 6 foot 3 inches tall, probably a bit taller than most, so the lowest point on the railroad (Ridgway) is 52 inches off the floor.  While this is ideal for someone my height, ti doesn't work for a lot of my friends.  Luckily, my friend and fellow Sn3 modeler Dale Kruetzer came up with a perfect solution; a series of platforms that are spread around the layout.  They are 32 inches by 14 inches and 5 inches tall.  Placing them side by side creates a longer platform while stacking can increase the height.

Two sheets of 3/4 inch cabinet grade plywood were used.  My son Andrew pre-cut all the components before we started assembly.  Andrew has a hi-tech wood working shop at home with all the bells and whistles; table saw, miter saw, planner, joiner, band saw, wood dust collector, etc. 

A rabbet was cut into the top, bottom and ends of the long sides on a table saw.  The upper rabbet allows the top to drop down 3/8 of a inch into the sides.  The lower rabbet allows a second platform to rest on top of a lower platform without sliding around.  The short sides slip in between the rabbets on the ends.  The two sheets of plywood yielded enough material to build nine platforms.  

Here are all the components laid out on the work table along with first test build.

The platforms were assembled with a nail gun and carpenters glue.  Here is that first test bio;d platform clamped and waiting for the glue to dry.

.

Note

I have added a "Favorite Links" section below the "Blog Archive" section on the upper right.  As always you comments, suggestions and questions are welcome.   

sdepolo@outlook.com


Monday, June 10, 2024

Construction Update #30 - Finishing up the structures for Placerville & the Ridgway Depot


Placerville Cafe-Bar & Gas Station

 June 2, 2024
 

I finally got around to adding a few trees to the hillside behind the cafe-bar and the gas station which allowed me to set these two structures in place.  I still need the sign over the entry to the cafe-bar, a few more details, vehicles and figures.  In the not to distant future, I need to get out the static grass applicator and add a few shrubs. 


Placerville Depot Restrooms

 June 2, 2024
 

The Placerville Depot restrooms is the last of 4 McCarville Studios structure kits I bought to finish off the Placerville scene.  The restrooms were painted to match the depot and the kit provided shingles were replaced with peel & stick versions that were a better match to ones already on my Placerville depot.

Here are the components laid out on the desk ready for assembly.

 
After the parts were painted, I realized that the privacy fencing scaled out to be about 4 scale inches thick; much thicker than I felt it should be.  Since the restrooms are right up front on the layout, I decided to replace the kit supplied fencing using scale 4 x 4's for the posts, 2 x 4's for the rails and 1 x 10's for the fence boards.  I think 1 x 8's would have looked better for the fence boards but I didn't have any on hand.  The privacy fencing was shortened on one side and a railing was added per the photograph and plans on page 273 of the RGS Story, Vol I. The walls were reinforced to prevent warping and roof braces were added to make the roof removable.


After the walls were attached to the base, I discouvered the alignment tabs on the walls extended out beyond the surface of the adjoining wall making it impossible to get the corner trim to lay flat.  Had I realized this before the walls were glued together it would have been an easy fix.  Fixing the problem after the walls were glued together involved cutting, sanding and repainting.  The trim material was also replaced with something a bit wider to achieve a good corner joint and cover the alignment tabs.  

The restrooms still needs some weathering.  Since the roof is still removable, the fence bracing has not yet been installed.

I found it interesting that the plans show and the photos appear to show that both doors were on the same end of the building.  It seems to me that it would have been more logical to separate the restrooms (men & women) by placing the doors on opposite ends with a separating wall built across the width of the building.

The restrooms temporarily set in place next to the depot.  With a few minor changes, the kit builds into nice little addition to the depot scene.


Placerville Structure Recap

The Placerville structures along Front Street from north to south.  Click on the pictures to enlarge.


Gas Station & Cafe Bar - Laser cut wood kits from McCarville Studios


Harvey's Hardware & Miner's Supply - Laser cut wood kits from Wild West Models.  Harvey's Hardware built by Bruce Hanley.


Residence on Front Street - Scratch built, wood over styrene core.  Grandt Line doors and windows.


Residence on Front Street - Scratch built wood over styrene.  Grandt Line doors and windows.


General Store - Monster Modelworks


Post Office - Scratch built wood over styrene core with modified Grandt Line doors and windows


Residence on Front Street - Scratch built wood over styrene core.  Grandt Line doors and windows/


Garage - Scratch built using left over wall sections from general store kit from Monster Model Works.  Modified doors and windows from Grandt Line.


Hotel - Bar Mills Idaho Hotel kit


.


The Placerville structures along the tracks from south to north. Click on the pictures to enlarge


 Coal Bins & Warehouse - Banta Model Works, built by my 11 year old grandson Adam.


RGS Warehouse - Scratch built out of styrene


Placerville Depot - Ragg's... To Riches kit


Depot Restrooms - McCarville Studios kit


Flour, Grain & Ore Warehouse - Scratch built out of styrene


Scale & Scale House - Scratch built wood over styrene core.


\

Ridgway Depot

June 7, 2024

Yep....  The depot is coming along... slowly.  Since the wainscoting had a tendency to warp, I had to use clamps to hold it in place while the glue set.  And, since I only have four clamps that would work, the wainscoting took about a week to install.  The rib rail, that separates the wainscoting from the clapboard siding, only took a couple of hours to install.

 
The clapboard siding had to be handled with care.  Several pieces were split right out of the sealed parts bag and had to be repaired.  The clapboard siding was taped to the top of the kit box and painted depot buff.  The wainscoting and rib rail, that were already glued to the inner walls, were painted brown.  Floquil paints were used.  
 

Here, the first couple of clapboard wall sections have been glued in place.  Again progress is slow due to my limited number of clamps.  Originally I was a little concerned about how well the wall sections would line up (window and door openings, corners, etc.).  So far, everything has lined up perfectly.
 

While the glue is drying on the clapboard walls sections, shingles are being applied to the upper wall sections.  Due to the size of the depot and the cost of replacing the kit supplied shingles with peel & stick versions, I decided to go with the laser cut versions provided with the kit.  The kit instructions recommend using 3M Super 77 spray adhesive for attaching the shingles.  I have never had much success using this method; it's difficult to control where the spray glue goes and I find it very unforgiving.  Instead, double sided tape is used.  The tape is available from Wild West Models https://www.wildwestmodels.com/products/details-tools.html  I highly recommend it.  In addition Wild West Models has a excellent line of laser cut kits and accessories in multiple scales.


The Signs of Progress 

I like to keep my work room neat!  For years this was a home office.  I took it over about 15 years ago when it was no longer needed for that purpose.  Pam, my tolerant bride of almost 42 years, rarely steps foot in this room.  She prefers to close the door and ignore the mess.


As always, your comments, suggestions & questions are welcome