Sunday, November 26, 2023

Construction Update #14 - Planning Vanadium, TCX #70 and Scenery around Wilson


Note: While waiting for my order of rail joiners and laser cut ties for my turnouts, I decided to spend a little time working on a couple of other projects.

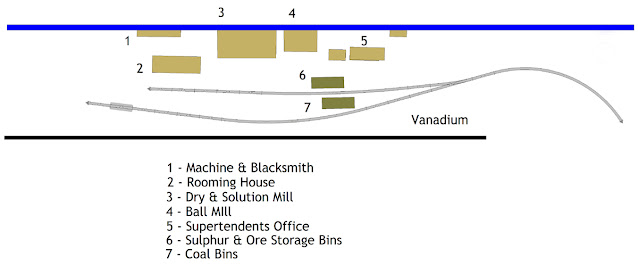
Planning out the Vanadium Scene 

November 23, 2023 (Thanksgiving Day)

Vanadium was located at Milepost 33.  The original ore-milling site was developed by the Primos Chemical Company.  Later the site was taken over by the Vanadium Corporation of  America who ran the site through World War II.  Originally the vanadium processed here was used for steel hardening and the uranium for medical and scientific purposes.  During World War II, the mill was used to process uranium and radium for military purposes.

While the complex was large, I only have a fraction of the space necessary to represent the scene; about 30" by 60"  And of this, the space available for the mill and supporting structures on the far side of the spur is about 14" inches by 60".  The backdrop will also need to be changed as there isn't a lot of vegetation around the mill site.

In order to determine the must haves elements, I studied the photograph on pages 312 and 313 of The RGS Story Volume 1 from Sundance Publications and chose 6 primary structures.  Other small structures may be added if space allows.

Then I identified the "must have" structures.

The Boarding House - It appears that ore was loaded into box cars on the spur in front of the boarding house.  Due to it's extreme weight, the pile of ore was placed directly over the trucks.
 

The Machine Shop -  Located a short way up the hill and behind the boarding house. The plan is to reduce the depth to about 2" and place it up against the backdrop.

The Dry, Wet and Solution Rooms - Again this building front will only be about 8" deep and placed up against the backdrop.

The Ball Mill - A 6" deep front placed directly against the backdrop.


The Superintendent's Office - Both the length and depth will have to be reduced by about 25% to fit.

The Coal, Ore and Limestone Bins

After the buildings were chosen, the dimensions were estimated based upon the photo and the available space and simple drawing were made for each structure.  Here is the one prepared for the boarding house.  Once all the drawings were done, they were laid out on the desk and adjustments were made to fit the space.  All of the structures had their depths reduced, some more than others.

The Plan


The Structures

November 24, 2023

Most of the structures are pretty simple so I decided to make mock ups using old Priority Mail boxes I've saved.  Once I had all of them built, with the exception of the limestone & ore bins, I set them place on the layout.  I moved them around and adjusted the heights and came up with the following arrangement.  It should be noted that the mill underwent significant changes over the years and that my structures are a combination of what is seen in photos and what will fit in the available space.  Finally, a couple of building flats above and slightly behind the mill may help provide depth and give the impression that the complex extends further up the hillside.

,

 
Here's a colorized photo of the mill complex.  It appears that most of the buildings were painted a dark green with white trim.  The superintendents office appears to be well maintained while the other buildings show significant signs of faded paint and weathering. 

                                                                                                                                                                   Both pictures from the Denver Public Library Digital Collection

TCX #70

Another small project I worked on was the re-lettering of a PSC double dome tank car.  I had painted and lettered this car for Artic Oil.  All it took to strip the old lettering off on this car was a strip of paper towel soaked in Micro Sol and positioned over the lettering for about 5 minutes.  Thin Film decals were used to letter the car.  It should be noted that the quality of this set is not very good.  There were numerous voids in the printing; most notably the car number and striping above and below the number. The dimensional detail and other small lettering is fuzzy and in some cases illegible.  Again, this car was weathered with Bragdon powdered pigments and finished off with a coat to Tamiya clear flat.


Developing Scenery around Wilson

November 25,2023

I have decided to work on the scenery around Wilson.  Since most of my scenes are being built on movable modules, I have been trying to avoid using a lot of plaster on the layout.  As a result, hours have been spent on YouTube watching tutorials on how to create rock work using insulating foam.  And, since a shear rock wall  is needed behind the Wilson section house and speeder shed I thought this might be a good place to give it a try.

Here is a sample near the prototype location

Here's what I came up with.

 
Here is the actual location on the layout.  The random pieces of 1" pink foam were glued together.  This wall is made up of three sections, removable, 8 to 13" high and measures about 48" long.


Finally, the laser cut ties for the turnouts arrived yesterday and the rail joiners should be here tomorrow (Monday) or Tuesday so the track gang can get back to work!
 
As always, you comments, suggestions and questions are welcome
 

Wednesday, November 22, 2023

Construction Update #13 - Sn3 On A Budget, Trout Lake House, Trains arrive in Vance Jct

Sn3 on a Budget

Conoco Tank Cars...... Well, Kind Of

November 20,2023

I'm not really sure where these cars originated from but I picked three of them up for next to nothing during the Paul Scoles estate sale.  I think they were built using Athearn tank car parts along with a partially scratch built frame; the trucks are P-B-L.  Interestingly enough, the cars were lettered for "Artic Oil".  Artic Oil was a prominent shipper on the late Brian Ellerby's 1940's era Copper River & Yukon (Alaska). 

At the time, I thought it was kind of strange to see them at Paul's estate sale.  After all, Paul's layout was a turn of the century operation located in Northern California and Brian's 1940's era Copper River & Yukon was situated in Alaska.  But here they are, along with Paul, on the double truss bridges that crossed Pelican Bay.  For anyone that's interested, I have the two bridges pictured in the photo that I can't use.

Anyway, I decided to strip and re-letter the three stand ins for the CONOCO cars that were common on the RGS.  Evidently, the car were used to ship gasoline.  Micro Sol along with a fiberglass burnishing brush was used to remove the lettering.  They looked pretty rough at this point.

The cars were then given a light coat of Tamiya Gloss Black.  At this point they looked even worse and almost found their way into the trash can.

They were lettered with Thin Film Decals and given a coat of Tamiya flat clear.  The weathering was done with Bragdon powdered pigments followed by second coat of Tamiya flat clear.  Are they great models? Not a chance.  But for a total investment of about $20 each they will do until I can come up with the thousand dollars or so it will take to replace them with those accurate brass models from P-B-L.

 
Note - I just learned that these and similar conversions may have been sold at one or more of the Narrow Gauge Conventions during the 1990's.  I'm curious if anyone knows more. 

RGS 7409

With the exception of the Narrow Gauge Convention or the Sn3 Symposium I don't ever recall finding any Sn3 equipment at a general model railroad swap meet...  That was, until I attended a local swap meet with a N-Scale buddy sponsored by the Boeing Model Railroad Club.  There, on a table mixed in with a bunch of odd ball HO and N scale equipment, was the RGS 7409 shown below neatly packed in a plastic box.  There was also a D&RGW long reefer sitting right next to it.  The asking price for the RGS 7409 was $5.00 and for the long reefer $4.00.  The reefer needs a little work.


The Trout Lake House

I also bought a Raggs..To Riches kit I didn't even know existed; The Trout Lake House.  The box says the kit is from a "Private Run".  I'm curious about the kit too so if anyone knows any more about it, I would like to know sdepolo@outlook.com

The Track Gang - At Vance Junction

November 22, 2023

About 75% of the track is down and wired at Vance Junction.  The gang would be further along but for the lack of code 70 rail joiners and #6 turnouts waiting for QuickStick Laser Ties. 


Paul Scoles Truss Bridge

November 22, 2023

 One of the Paul Scoles truss bridges found a home this morning.  I still have one left for anyone that's interested.


As always, your comments, suggestions & questions are welcome

sdepolo@outlook.com

AND

HAPPY THANKSGIVING


Saturday, November 18, 2023

Construction Update #12 - The Track Gang works further south & Operations

The Track Gang moves South

 
The Extra #463 South exiting the siding at Wilson.  The San Miguel River is on the right; the spur at Vanadium is in the distance.  The buildings at Vanadium are all "stand ins".
 

According to the locomotive tonnage rating explained in the following section(s) the #463 with six loads and two empties should be able to reach the summit at Lizard Head without a helper.  Wilson is in the background and the San Miguel River is on the left; the pink foam profile on the right represents the future hillside.
 

 On the 2% grade between Vanadium and Vance Junction
 

The current end-of-track at the north end of Vance Junction.  The radius here is 30" with easements. 
 

Operations

I've spent the last few days exploring the Fist District's operational possibilities. With the exception of a few mines, mills, seasonal livestock movements and a little overhead traffic, the RGS never had much business following the Silver Panic of 1893.  This was a concern when I decided to build a layout based upon the 1st District during the fall of 1942 but I pressed on anyway.  As it turns out, there is enough traffic with helper operations to justify Timetable and Train Order operations along with a crew of 7-10 operators.   At least three train crews, a dispatcher and a yardmaster at Ridgway will be required.

Decapod Systems Caroute Version 6

I was introduced to Decapod Systems software about 25 years ago by Bob Christopherson.  Bob, a well known Sn3 modeler who lived here in the Seattle area, was using Decapod System's Planned Railroad Routing on his D&RGW layout.  Not long thereafter, I purchased the software and used it on several layouts.  And then a few years back, Jim Botsko the owner and developer of PRR, told me about a new program he was working on.  Shortly thereafter he sent me a copy of the new program along with the update I had ordered for the original program.

Caroute is a computerized version of the manual waybill/car card system originally sold by Old Line Graphics and currently available from Mico-Mark. Caroute uses a set up file and four data files; Towns, Industries, Cars and Trains to generate switch lists.  Unlike the car cards from Micro-Mark that are limited to four destinations, Caroute allows for up to 20 destinations for each car.  

Once the data has been created, the system will generate switch lists.  The switch lists assigns cars to be moved from one location to another by specific trains that serve the appropriate industries, yards or spurs.  The program stores the locations as the cars move and it assumes that the cars are physically moved to the assigned locations and stay there until the next set of switch lists are generated.  The system also generates a variety of reports to include beginning and ending status (car locations), error and warning reports, data analyzers and other reports.  Finally, there are nuances like train length, industry and spur capacities, layovers, whether the car is a load or not, and other factors that impact how, where and when a car moves.  In other words, the program replaces all those car cards, waybills and bill boxes with a simple switch list.

Once each file is populated with data, the program moves from one operating session to the next without any additional input.  The files can easily be updated and I have used the software without a hitch on 3 previous layouts.

Switch Lists

Here is one of the first test switch lists for a Ridgway to Rico extra freight on my RGS 1st District.  I limited the number of cars I input into the system for my initial testing to 25.  Limiting the number of cars makes it easier find errors in your data.  The program allows you to reformat the output (switch list) files to make changes in the appearance of the switch list or add supplemental information.  I made numerous changes using Excel to include the addition of the two columns on the far right (tonnage).  More on how I use tonnage is covered in a following section.

Rolling Stock Weights

Railroads use trailing tonnage to determine how much power is needed to move a train over the line.  I did a little research and decided to use the following weights to simplify tonnage and motive power requirements.  Most D&RGW 30' freight cars had a 50,000 pound or 25 ton load limit but there were exceptions.

Short Caboose 10 Tons
Long Caboose 13 Tons
Empty Freight Car 11 Tons
Empty Tank Car 16 Tons 
Empty 6500 Series Flat 14 Tons
Loaded Freight car 25 Tons 
Loaded Tank Car 30 Tons
Loaded 6500 Series Flat 40 Tons

Locomotive Tonnage Ratings

The following tonnage ratings were taken from February 14, 1943 Rio Grande Southern Timetable.  Of interest is the fact the ratings for both D&RGW C-21's and the one D&RGW C-25 are listed on the ratings table for the 1st District between Ridgway and Rico.  They were not included for the 2nd District between Rico & Durango.  As far as I can tell, neither class ever operated on the RGS.  But, I have models of both so they may in fact sneak onto the layout at some point!

Note that the maximum tonnage for the Extra South listed in the above switch list is 201 tons between Matterhorn and Lizard Head.  The only locomotives used on the RGS capable of handling that much tonnage, unassisted, between Vance Junction and Lizard head were the K-27's.  Of course weather, condition or availability of locomotives and other factors could impact whether a second locomotive would be assigned.  The RGS special instructions in the 1943 timetable provided for a lot of latitude when it came to locomotive assignments.


The Timetable

I found that when I hosted operating sessions on my old Alaska Pacific, Timetable and Train Order operations added significantly to both the challenge and enjoyment of operating the layout.  Here is the current timetable for my 1st District.  Note there are no times for train #371/372 (Galloping Geese) since I only have about 15% of the track in place and have not been able to set a schedule using a 4 to 1 fast clock.


Additional Forms

Form 19

 
I couldn't find a actual "Rio Grande Southern" train order.  Apparently, the RGS used D&RGW forms during the period I model.  Ken Seacrest has several train orders from various locations on the RGS using D&RGW paperwork posted on the internet.  https://train-orders.com/TOUR/R/RGS/RGS.html  The actual format shown below is based upon the one I used on the Alaska Pacific (Southern Pacific).

Clearance

When using Train Order and Timetable operations, every train must have a clearance card issued by the originating terminal.  Again, I chose to adopt the form used on my former Sn3 layout.


The Employee Timetable

The employee timetable incorporates the timetable shown above along with the special instruction and other related information.  I normally provided a Alaska Pacific timetable to first time operators a week or so before the session.  For the Alaska Pacific, I included a general orientation, train descriptions, estimated running times (fast clock) between stations and station plats.  While I have yet to develop all the elements necessary for the 1st District Timetable, I have included a photo of the old Alaska Pacific Timetable.

Train #372 at Placerville.

As always, your comments, suggestions and questions are welcome


Sunday, November 12, 2023

Construction Update #11 - The Track Gang, View Blocks & Ridgway


The Track Gang arrives in Placerville

 November 8, 2023

The Test Train - P-B-L Rio Grande 2-8-0 #346 and a P-B-L Rio Grande boxcar.

I use Midwest HO Scale cork roadbed on the Sn3 RGS 1st District.  It is glued down with yellow carpenter's glue.

I use a sanding block to smooth the top of the cork and contour the edges.

Leads are soldered to the bottom of every other section of flex track.  Attaching the leads to the bottom of the rail makes them virtually invisible.  I file the bottom of the rail to give it some tooth and then tin both the bottom of the rail and the leads,


The leads are then soldered to the bottom of the rail;


I glue the track down with thin layer of clear Loctite Polyseamseal,  The Polyseamseal, an acrylic adhesive caulk, goes on white but dries clear.  In my area, neither Home Depot nor Lowes has Polyseamseal but I can normally find it at my local Ace Hardware.  Pins are used to hold the track in place until the caulk dries.

I used to solder my leads to the bus but not any more.  Now I am using Wago 221 Series Lever Nuts.  These simple lever connectors make it easy to connect different wire types and sizes.  They come in 2, 3 and 5 conductor sizes.  They are reusable, made in Germany and you can buy them on Amazon.  The 5 conductor size is shown below.  The larger wire is the bus, the smaller ones are the leads/drops.  The average cost is about 60 cents.

I use a meter and test for continuity and shorts as I go.

After about an hour, I remove the pins, clean the track and run my train!


Turnouts

All of my turnouts are built from Fast Track fixtures and glued in place with Polyseamseal.  Caboose Hobbies ground throws are being used on all but a couple of turnouts that can't be easily be reached.  I was able to salvage most of the turnouts from my previous Sn3 layout so they are being reused.  After they were removed from the old layout I made sure they were straight and gauged properly.  A lot of the old wood ties were replaced as were some of the printed circuit board ties.  I do drop a lead from each of the insulated frogs even though my locomotives don't require them.  The 1st District locomotives are all equipped with Tsunami2 sound decoders and TCS KA1 or KA2 current keepers.  But, eventually all the turnouts will be equipped with Tam Valley "frog juicers" just in case and for visiting power that may not be equipped with current keepers.


A Plan for Ridgway

November 11, 2023
 
 
I have had several comments about the lack of a yard or engine service facility on the layout.  I originally left the idea of modeling Ridgway off the plan due to the lack of space and my desire to model several other scenes as closely as possible.  One viewer of the blog even sent me a "suggested" plan.  Unfortunately, there just wasn't enough room to lay out the yard and engine facility to closely replicate the prototype.  Regardless, here is what I came up with.  A hillside between Old Placerville and the mainline would hopefully create some perceived distance between Placerville and Ridgway.


The engine facility is pretty much laid out like the prototype but it is flipped horizontally to fit the space.  Since it would be built as a module, it could be flipped back into the proper orientation should it get moved at some point.  The module is 30" deep on the left and 24" deep on the right.  It is 8' long.  The addition of Ridgway would certainly add to operations.  The only real problem with this plan was the need to re-work the Lizard Head wye in the original plan.  But, I had already done that.  The wye in the previous plan was directly above an aisle that required a large duck under.  The changes at Lizard Head and the additional siding between Matterhorn and Trout Lake are shown in the following plan.  The wye on the previous plan has been replaced by a return loop that is located outside the main room. The return loop can be used to turn helpers or complete trains.  The entrances to and from the reverse loop are hidden in the snow shed.  The prototype wye was also in a snow shed so the return loop isn't a huge compromise.  Lizard Head will be on a narrow shelf above the proposed Ridgway and the oversized duck under/swing away is now a single track just inside the door.  (Ridgway and Rico Staging are not shown on this plan)

I would really like to know what you all think...  sdepolo@outlook.com

View Blocks

I have been going back and forth between having and not having view blocks for some time.  I have built layouts, in my existing space (22'x27') with and without view blocks.  While I understand the advantages of view blocks and their ability to create distance between scenes, I tend to prefer layouts without them, especially in smaller rooms, when terrain (hills and mountains) can be used to accomplish the same thing.

The RGS 1st District started out with a view block between the Vance Jct scene and the Bridge 45A/Ophir scene.  I initially cut the view block back about 4' so that the Vance Jct section house and out buildings could be viewed from both sides.  This was somewhat of a compromise since Bridge 45A could also be seen from both sides.  In the end, I decided it was worth it. 

I decided to do a test, with and without a view block, between the north end of Vance Jct and Trout Lake.  The tracks here are about 12" apart and the difference in elevation is about 6".  I installed the back drop and glued some pink foam profiles in place.  I didn't like the result, especially on the Vance Jct side, so the hard board view block between Vance Junction and Ophir/Trout Lake was removed and the profiles were replaced.

Here is how the scene looks from the Trout Lake side without the view block.  I think the scene, without the view block, is more expansive.  Eventually the tree line on the far wall, above Vanadium, is all that will be seen from the Trout Lake side.

Here is the view from the Vance Jct side.  The dividing hills are just tall enough to block a train on the far side.  Again, the hills on far side open up the scene and create distance.  Backdrops on a view block can create depth, especially in photographs, but in my mind eliminating them on a peninsula if possible can be a plus.


The Track Gang makes it into Wilson

November 12, 2023
 

As always, you comments, suggestions & questions are welcome

https://sn3rgs.blogspot.com/