Sunday, April 28, 2024

Construction Update #25 - A Tale of Two Projects

Old Placerville


Placerville Structures - McCarville Studios Placerville Cafe-Bar

April 20, 2024

Ny version of  Old Placerville will include several structures.  The first two, the fuel oil depot and stock pens have already been built; the first from a Ragg's...To Riches kit the second from two Banta Modelworks kits.  Three more are beng built from McCarville Studios kits; the cafe-bar, gas station and barn.

The McCarville Studios Placerville Bar-Cafe

I decided to start to with the cafe-bar.  I built the model per the instructions with the exception of the laser cut paper shingles included in the kit.  Based upon a close examination of the color photo on page 258/259, "The RGS Story, Vol 1" (Sundance Publishing), I came to the conclusion that the included shingles were to large and uniform when compared to those on the prototype.  I will probably end up using "peel & stick" shingles from Builders In Scale or Rail Scale Models.  In addition, due to the shallow pitch of the porch and rear shed, I decided that rolled roofing would probably be more appropriate than shingles.

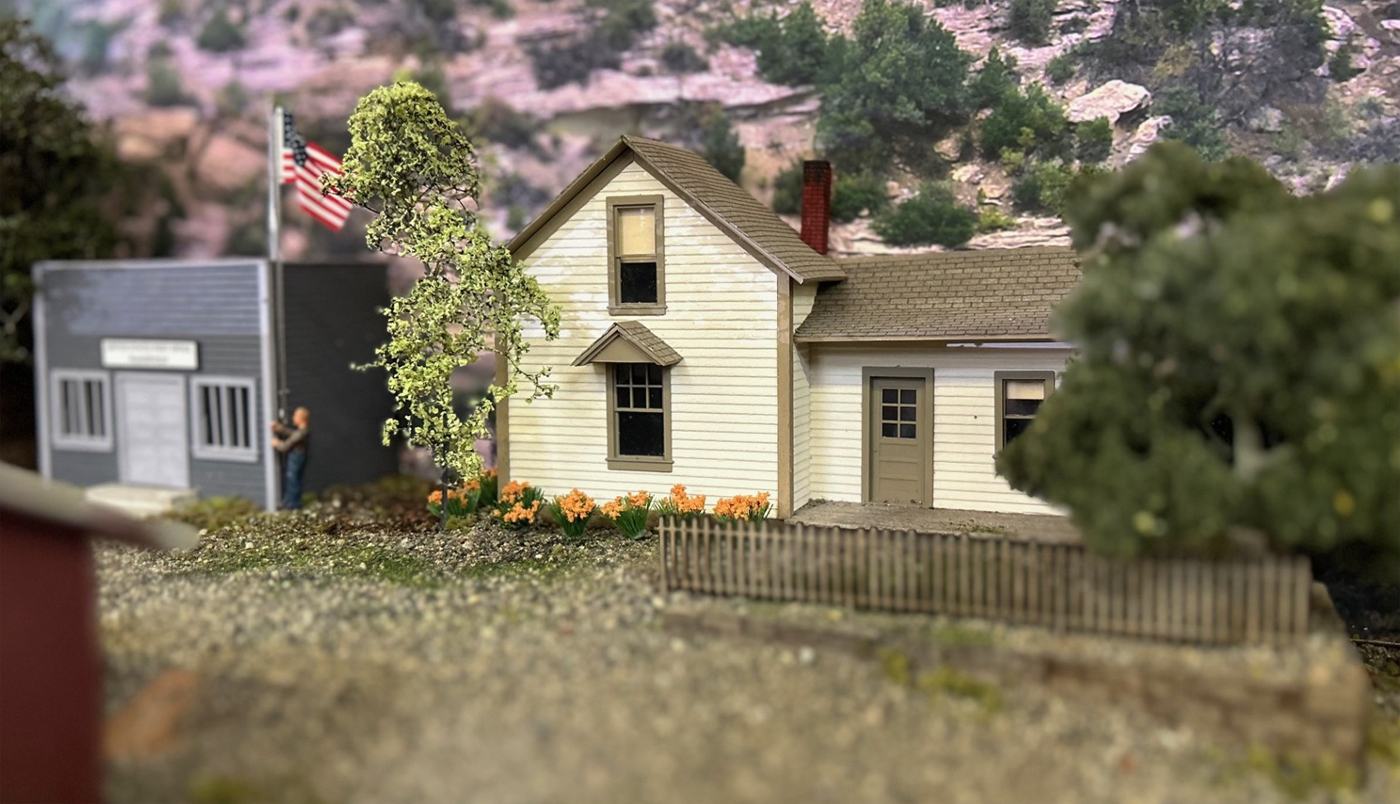
Here is a picture of my model waiting for a roof.

Make no mistake that the McCarville Studios kit builds in to a very nice and interesting structure but I do have a couple of observations/suggestions.  First I think the instructions could be improved by adding more "how to" along with a couple of pages with larger photographs. I also question the use of MDF for the core material.  MDF is brittle, the corners are fragile and it is easily damaged by moisture.  Although there is no mention of it in the instructions, it should be sealed, especially the base, to protect the parts from moisture.  I exposed a piece of the MDF to water and watched it swell, warp and loose all of its rigidity.  As a result, I sealed all of the MDF with two generous coats of flat lacquer before I started any assembly.  I think 1/16" or 3/32" of marine plywood would be a better choice of material.  

I find that building up the sides to include the siding, windows, doors and trim, were possible, before attaching them to a base makes for easier assembly.  And, while there is some mention of interior bracing to prevent warping I think most kit or scratch built structures should include interior bracing regardless of the construction materials.  As can be seen in the following photo, I used 3/16" square strip wood  to add the bracing.  I used Aleen's "Original" Tacky Glue for all of the assembly.


Basic Scenery for Old Placerville

April 27, 2024

I am using a hillside to transition between the scenery around Old Placerville/Placerville and Ridgway.  I used a Woodland Scenics incline set to create the roadway followed by a series of "pink foam" profiles.  Eventually the caf-bar and gas station will be located in the foreground between the road and the tracks.

Here is a overall view of Old Placerville.  A staging track representing Montrose will be located behind the hillside and between the backdrop that has not yet been installed.  The Texeco fuel oil dealer was built from a "Ragg's... To Riches" kit by Bruce Hanley.   I built the stock pens using parts from two "Banta Modelworks" kits. The cafe-bar, gas station and bar will be located on the far left.

The profiles were covered by cardboard webbing, a layer of painters paper and then plaster cloth.  Generic plaster cloth can be purchased on Amazon for about half the cost of  similar products available from hobby shops.

The plaster cloth was then followed up with a layer of Sculptamold.

Basic Ground Cover

The "hard shell" was given mix of white glue and earth colored exterior house paint.  Paving sand was sprinkled on to the paint-glue mix along with several colors of fine turf.  Once the new backdrop is installed I will add more texture (trees, shrubs, grass, etc) in order to blend the Placerville-Old Placerville-Ridgway scenes together.  No, that corrugated shed doesn't belong in the stock pen!

As always, your comments, suggestions & questions are welcome


Wednesday, April 17, 2024

Construction Update #24 - Scenery around Placerville & Bridge 45A

Placerville


Scenes from around Placerville 

There are three grade crossing in Placerville.  The first one, south of the depot is shown below.  The crossings are from Tichy, the plank for the crossing were made from scale lumber and the caboose is a P-B-L model.

I built the depot from a Ragg;s kit.  It was painted with Floquil paints and weathered with Bragdon powdered pigments.  This figures are from Fun and Games.  I don't glue the figures in place.  Instead, I pin the figures in place so they can be easily moved or replaced.


There are a number of structures along Front Street behind the depot.  All of these are fronts about 2" deep.  The Placerville Garage was built with parts left over from the Monster Model Works Placerville Store.  Most of the trees here were built from Scenic Express Super Trees.

North of the garage is this little house.  It was scratch built using a photo off the internet.

The post office was right next door.  Again, it was scratch built using photos off the internet.  The flag pole is from Woodland Scenics and the figure from Fun and Games.

The PLacerville store was built from a Monster Model Works kit.  Again is is only about 2' deep.


 Another scratch built house built from photos located north of the store.


The second crossing north of the depot.  The #346 has uncoupled from it's train and pulled forward to clear the grade crossing.

This little material yard is located on the north end of the house track.

None of these little scenes are finished.  I need to add more details, additional ground cover, shrubs and static grass.


Bride 45A

April 14, 2023
 

Yes, work continues on Bridge 45A.  All 22 bents are now finished as is the bridge deck.  The prototype had 29 bents.  About 600 individual pieces of strip wood were cut, stained and assembled to make the bents.

North Bents

Center Bents

South Bents 

I cut 325 bridge ties for the bridge deck.  I ordered the wood from Northeastern Scale Models.  The wood from Mt. Albert or Kappler is nicer but the material from Northeastern is much cheaper, when purchased in bulk, and is "good enough" for bridge stock.


 As always, your comments, questions and suggestions are welcome

sdepolo@outlook.com 


Wednesday, April 10, 2024

Construction Update #23 - Scenery

Wilson - "Milepost 32.6.  Elevation 7.723 feet - was primarily a passing siding of 27 car capacity."  (Page #305, RGS Story, Volume 1, Sundance Publishing)

April 8, 2023
 

While Wilson is still lacking some detail to include additional ground cover, static grass,  shrubs, figures and water, it now provides an acceptable background for a few photos.  Here RGS #455, a K-27, has stopped for water.  Most if not all of the RGS water tanks were painted oxide red.  But since I have yet to find a actual picture of "Wilson" who is to say that the tank, if one ever existed, escaped the RGS B&B gang and a coat of oxide red paint.  The K-27 is from P-B-L and the water tank was built from a V&T Models kit.

 
Northbound leaving Wilson for Placerville.  The east bank of the San Miguel River is in the foreground.
 
 
The stock car was built from a P-B-L kit and the drop bottom gondola is from a V&T kit.  I don't think I have ever seen a picture of a drop bottom gondola on the RGS but there are a couple running around my version of the railroad.


The box car storage shed attached to the section house.  This kit-bashed model is based upon a similar structure that stood at Pagosa Junction.


Leased D&RGW #346 southbound at Wilson.  #346 is a P-B-L brass import equipped with DCC and Tsunami2 sound.  This model has an interesting background as it was originally lettered for Brian Ellerby's Copper River Yukon, then my Alaska Pacific and now the D&RGW.


Initial Scenery around Placerville

I typically start with earth colored paint followed by a layer of basic ground cover (paving sand) around a key scenic element; in this case the depot.

Here, the same thing has been done with the hotel, coal bin and small warehouse to the south of the depot.  The Bar Mills "Idaho Hotel" is a stand in for the original hotel.  A Banta warehouse kit, built by my 11 year old grandson, is another stand in for the Gallaway Stage Stop Building (He still needs to paint the roof). 

And in this case, the "scenic element" is a drainage ditch that was west of the depot.  A partial view of this ditch shows up a picture on page 273, Volume 1, RGS Story, Sundance Publishing.


As always, your comments, questions & suggestions are welcome


Wednesday, March 27, 2024

Construction Update #22 - Scenery around Wilson, RGS #42


Scenery around Wilson

It's been nearly a month since my last post.  April has been a pretty busy month and the amount of time I've had available to work on the layout has been limited so here is a quick update.  Here is where I left off in the last post.

Since color is one of the most important elements when it comes to scenery, I like to start out with a small "test" section based upon a couple of photos I find on the internet.  As can be seen, in the following photograph, there is a lot of variety when it comes to the "right" color.

After several tests, I decided to moderate the intense "reds" shown in the photographs since the resulting rock work just look real to me under the lights I am using (LED 4000).  In fact, some of the actual material I collected from the area, back in 1998, actually took on a violet hue.  Here is what I came up with.  Ace Hardware mixed the paint for the rock work that was then tinted with several different colors of craft paint (thinned or dry brushed).  The ground cover is all natural, which the exception of some ground foam,  The ballast is paving sand from Home Depot and the rest of the ground cover is a blend of paving sand and decomposed granite found on Old Blewett Pass Road here in Washington State.  The tree was made using "Super Trees" from Scenic Express.  

Fudd's Crossing

 
The Fudd's crossing trestle also got installed in the last couple of weeks.

Installing the crossing included the cutting in a a new turnout.

Once the turnout and track were in place, I built up the scenery around the abutments to stabilize the trestle.

And, here is Fudd's at the end of the spur.  This structure was built by Bruce Hanley.

Here is an up-to-date picture of  Wilson as of 3/27. 

RGS #42

I also managed to pick up a P-B-L #42 (Later run with correct cab & cab window) this last month, three additional box cars and a Banta kit for the OPhir Tram House.

The #42 is equipped with DCC and a Tsunami sound system.  It runs and sounds great.  It does have some minor damage to the tender but it can be easily repaired and the price was several hundred dollars less than one of these models typically sell for.

These three cars were picked up off ebay for $60.00 each.  All three came in the original boxes and are nicely weathered.


As always, your comments, suggestions & questions are welcome

sdepolo@outlook.com


Thursday, February 29, 2024

Construction Update #21 - The Plan, Bridge 45A & Scenery around Placerville

 The Plan

 
Several people have contacted me recently over my current plans for the RGS 1st District.  Some changes have been made to the original plan...

A temporary reverse loop at trout lake has been built in order to delay the need for the duck under/lift out section in front of the entry door.  The space allocated for Old Placerville and the Placerville wye was reduced to make room for the addition of Ridgway and a couple of staging track to represent Montrose.  In the original plan, Ridgway was represented by staging.  And, a spur that crosses the San Miguel River at Wilson was added.

RGS 1st District Phase I


Phase II includes adding the duck under/lift out in front of the entry door, eliminating the Trout Lake return loop and adding Lizard Head to a shallow shelf above Ridgway.  The covered wye will be represented by a return loop in the dispatchers office.  Rico staging will be on a shelf above and behind Old Placerville.
 
RGS 1st District Phase II


Bridge 45A Bents

February 21, 2024

The center bents for bridge 45A are shown below.  Since I leave the bents in the fixture while the glue dries, I can only build one a day.  The process involves cutting the wood using the fixture, removing the wood for staining and then applying glue to the parts and placing them back in the fixture for the glue to set.  My condensed version of Bridge 45A will require 18 bents.


Here is the drawing of bridge 45A from the RGS Story Vol III, pages 203-204, Sundance Publishing.  I have completed bents 14-18, 23-27 and B.  My bridge doesn't include bents 19-22 due to my space limitations, I will have to shorten the bridge from 466 scale feet to about 280 scale feet or 52.5 inches.  I also reduced the distance between the bents by 2 scale feet to increase the apparent length.


Scenery South of Placerville

February 23, 2024

With the completion of all the track work at Ridgway, I decided to start the scenery around Placerville.  This made sense for two reasons.  First, I felt like doing some scenery, second the backdrop is installed and third all but the restrooms for the depot are now built.

This picture was taken at the south end of town.  The white foam represents the road that led to Telluride.  The profiles were cut from pink foam with a hot wire cutter and fastened in place with hot glue.  The San Miguel River is on the right.

February 24, 2024

The pink foam was filled in with cardboard webbing. Here, the hillside was used to transition from one background to another.  The webbing and pink foam were then covered by painter's paper.  The painter's paper was attached to the webbing with yellow carpenters glue.

February 26, 2024

The painter's paper was then covered with a layer of plaster cloth.  Some modelers, who don't use plaster cloth in the next step, apply a layer of carpenters glue to seal the painter's paper and then fill things in with Sculptamold.  I prefer to cover the painter's paper with a layer of plaster cloth and then follow up with the Sculptamold.

Here is another view of the scene looking from the other direction following the application of Sculptamold.  The pink foam rock was hand carved.  The cracks and seams were filled in with Dap light weight patch and paint.
 

Progress has been a little slow during the month of February.  Next month I will be working on the scenery around Placerville and finishing up Bridge 45A.  I also need to start working on RGS #41.  I purchased the P-B-L locomotive in pieces so it needs to be reassembled, have the headlight replaced, have sound installed, have the paint touched up and be lettered for the RGS.
 
As always, your comments, questions and suggestions are welcome