Rubber Rocks?
September 4, 2024
On my previous layout, the Arroyo Lobo Branch, I tried using some rubber rock castings sold by Cripplebush Valley Models. https://www.cripplebushvalleymodels.com/. The nice stonework shown here, behind the turntable on the old Arroyo Lobo Branch, was made using the Cripplebush "Sante Fe 3" casting. The rubber castings are light, flexible, and easily cut with a good pair of scissors. The original was 26" by 6". I cut it in half horizontally to create a cut about 50" long by about 3" tall.
For the Bridge 45A scene, I bought two rubber castings, Santa Fe castings #1 and #3. Santa Fe 1 is 28' by 10" and costs $70.00. Santa Fe 3 is 26" by 6" and cost $40.00. They come painted a gray/brown with some highlighting and can be used effectively without any additional work if your lighting creates shadows. The ones shown on the Arroyo Lobo Branch in the lead photo were used right out of the packaging. Additional painting/weathering/highlighting can be done with acrylic paints. Solvent type paints should not be used on these casting.
Following the instructions on the Cripple Brush web site, I made templates, using plain copy paper, and used them to cut out the required pieces from the robber rocks. Here they are pinned in place. During this process, I did make some changes to the hard shell (pink profiles).
September 7, 2024
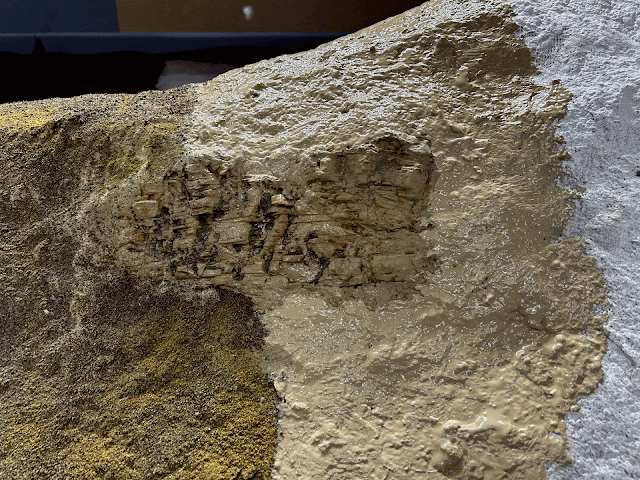
The rubber rocks were hot glued in place and blended into the existing scenery base with Sculptamold.
After cutting out the rocks, the small left over pieces were added to the scene. After these pictures were taken, the excess Sculptamold was removed off all the castings with a wet toothbrush.
Basic Ground Cover
September 25, 2024
Back after taking a couple of weeks away from the layout
Not a lot of detail here as I have covered my "basic" ground cover in previous posts. The rocks were lightened up dry brushing (my basic earth color) followed by a misting of diluted raw sienna, burnt sienna, raw umber and black. The basic earth color was then applied around the rocks.
Basic ground cover, paving sand, was then applied starting with a generous application of a earth color house paint and white glue mix. The paving sand was then spread on to the mix. This was followed by diluted matte medium sprayed over the initial layer of ground cover followed by second application of paving sand. This process was repeated with a third application of paving sand along with several colors of fine ground foam. The wet paint white glue mix is shown on the right side of the photo with the ground cover on the left.
Here is an overall photo of the hillside. The rubber rock shown in the above photo is in the upper right corner of this photo. Working about a square foot at a time, the hillside took about an hour and a half to get to this point. Applying the ground cover, over Scultamold, in several layers insures good coverage and all important texture. Eventually this basic ground cover, that looks pretty good now, will be covered with grasses, shrubs and trees. Oh, and I think those rubber rocks look pretty good!
The Bridge 45A has a river/creek that runs through the scene and cascades down a canyon and under the bridge. Before applying the ground cover around the river I decided to paint the riverbed. Woodland Scenics "Water Undercoat" was used; Hunter Green, Olive Drab and Yellow Silt. All three colors were blended together when they were applied. The track was then sprayed painted with a combination of Rustoleum camouflage Flat Earth Brown and Sand.
Upstream from Bridge 45A there is another river crossing. Originally I was going to cross on a low pile trestle. That is until I came across these cut stone culverts in a drawer. One had some damage but it didn't really matter since one side of the culvert would be difficult to see from the normal viewing angle. Craft paints were used on the stonework.
Here are the culverts installed with ground cover and a few extra details.
Trees & Other Vegetation
When comparing early photographs to ones taken near or after the end of operations, it's readily apparent that over the years, trees and vegetation grew up and around Bridge 45A. Based upon the following photograph (1952) and others taken near the end of operations, it looks like about 70% of the trees are deciduous.
Bruce Hanley came through again when he gave me about 200 trees off his layout. A few will probably need a little "freshening up", but the majority of them are ready to plant. These
combined with the tress I have off the old layout
should be more than enough to finish off the Bridge 45A scene. Since I can't install the bridge until most of scenery is finished behind it, the availability of all the trees off Bruce's layout should speed up the process.


